| Oracle® Database 2 Day + Data Replication and Integration Guide 11g Release 2 (11.2) Part Number E17516-08 |
|
|
PDF · Mobi · ePub |
| Oracle® Database 2 Day + Data Replication and Integration Guide 11g Release 2 (11.2) Part Number E17516-08 |
|
|
PDF · Mobi · ePub |
This chapter describes how to complete common tasks that are required in many data replication and integration environments.
This chapter contains the following sections:
To access data in multiple locations, you must first ensure that each location can be uniquely identified. Next, you must establish a communication path between these locations.
The unique identifier for each database is referred to as its global database name. By setting the initialization parameter GLOBAL_NAMES to TRUE, you guarantee that each database in your distributed database environment can be uniquely identified. A database forms a global database name by prefixing the database network domain, specified by the DB_DOMAIN initialization parameter at database creation, with the individual database name, specified by the DB_NAME initialization parameter.
The GLOBAL_NAMES parameter specifies whether a database link is required to have the same name as the database to which it connects. If you use or plan to use distributed processing, then Oracle recommends that you set this parameter to TRUE at each database to ensure the use of consistent naming conventions for databases and links in a networked environment.
To set the GLOBAL_NAMES initialization parameter to TRUE at a database:
Log in to Enterprise Manager as an administrative user who can change initialization parameters. For example, you can log in as a user with SYSDBA privilege.
Go to the Database Home page for the database instance.
Click Server to open the Server subpage.
Click Initialization Parameters in the Database Configuration section.
If you are using a server parameter file, then click SPFile. Otherwise, proceed to the next step.
On the Initialization Parameters page, enter GLOBAL_NAMES in the search tool.

Click Go.
Set the GLOBAL_NAMES initialization parameter to TRUE.
Click Apply to save your changes.
Ensure that you set the parameter permanently in either the server parameter file or in your initialization parameter file.
Complete Steps 1 through 9 for each database in your distributed environment. By default, the GLOBAL_NAMES initialization parameter is set to FALSE. Therefore, it must be set to TRUE explicitly at each database.
If you were directed to this topic from another topic, then go back to the topic now:
See Also:
Oracle Database Reference for more information about the GLOBAL_NAMES initialization parameter
If you plan to use any of the components of Oracle Streams in your environment, then configure an Oracle Streams administrator. Oracle Streams components include:
Queues
Queue tables
Capture processes
Synchronous captures
Propagations
Apply processes
Rules and rule sets
An Oracle Streams administrator configures and manages these components at each database where they are used. See the following topics in this guide for information about these components:
This tutorial creates the tablespace for an Oracle Streams administrator, creates the Oracle Streams administrator, and grants the Oracle Streams administrator the following privileges:
The privileges granted by the GRANT_ADMIN_PRIVILEGE procedure in the DBMS_STREAMS_AUTH package
These privileges are essential for an Oracle Streams administrator. See Oracle Database PL/SQL Packages and Types Reference for more information about the privileges granted by the GRANT_ADMIN_PRIVILEGE procedure.
The DBA role
The DBA role is required to create or alter capture processes, synchronous captures, and apply processes. When a user does not need to perform these tasks, DBA role can be revoked from the user.
EXP_FULL_DATABASE role and IMP_FULL_DATABASE role
These roles are required if the Oracle Streams administrator will use Data Pump to perform export and import operations on database objects in other schemas during an Oracle Streams instantiation. If the Oracle Streams administrator will not perform export and import operations on database objects in other schemas, then these roles can be revoked from the user.
Database Control administrative privileges
These privileges enable users to perform administrative tasks with Oracle Enterprise Manager, such as running Oracle Enterprise Manager jobs. If an Oracle Streams administrator exists in a database, and you want to grant Database Control administrative privileges to this user, then follow the instructions in Oracle Database 2 Day DBA.
Note:
You should not use theSYS or SYSTEM user as an Oracle Streams administrator, and the Oracle Streams administrator should not use the SYSTEM tablespace as its default tablespace.To create an Oracle Streams administrator named strmadmin:
The Oracle Streams administrator should use a dedicated tablespace that is not used by any other user. Queue tables and other Oracle Streams components require disk space, and a dedicated tablespace can meet these space requirements efficiently.
To create a new tablespace for the Oracle Streams administrator:
Log in to Enterprise Manager as an administrative user.
Go to the Database Home page for the database instance.
Click Server to open the Server subpage.
Click Tablespaces in the Storage section.
On the Tablespaces page, click Create.
The Create Tablespace page appears, showing the General subpage.
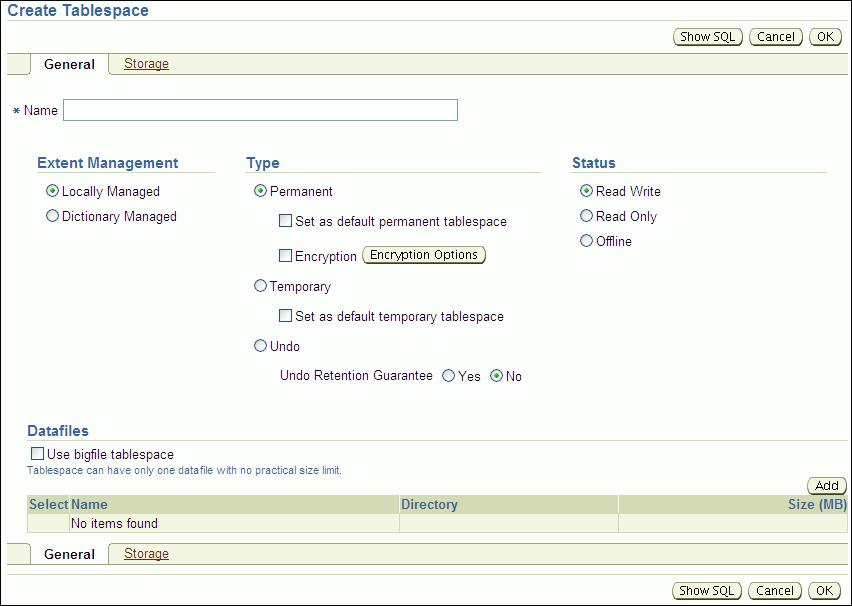
Enter streams_tbs in the Name field.
Click Add in the Datafiles section to open the Add Datafile page.
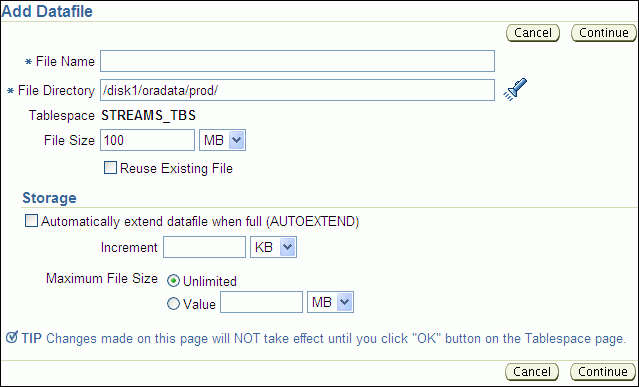
Enter streams_tbs.dbf in the File Name field.
Check the directory in the File Directory field and change it if necessary.
Change the size in the File Size field to 25 and ensure that the list is set to MB.
Select Automatically extend datafile when full (AUTOEXTEND) in the Storage section.
Enter 5 in the Increment field and set the list to MB.
Set the maximum file size in the Maximum File Size field. Typically, it is best to leave it set to Unlimited.
Click Continue.
On the Create Tablespace page, click OK.
Complete the steps in "Tutorial: Configuring an Oracle Streams Administrator" to finish creating the Oracle Streams administrator.
Note:
You can also use theCREATE TABLESPACE SQL statement to create a tablespace.This topic describes creating an Oracle Streams administrator that uses the tablespace configured in "Tutorial: Creating the Tablespace for the Oracle Streams Administrator".
To create a new Oracle Streams administrator named strmadmin:
Log in to Enterprise Manager as an administrative user.
Go to the Database Home page for the database instance.
Click Data Movement to open the Data Movement subpage.
Click Setup in the Streams section.
The Streams page appears, showing the setup options.
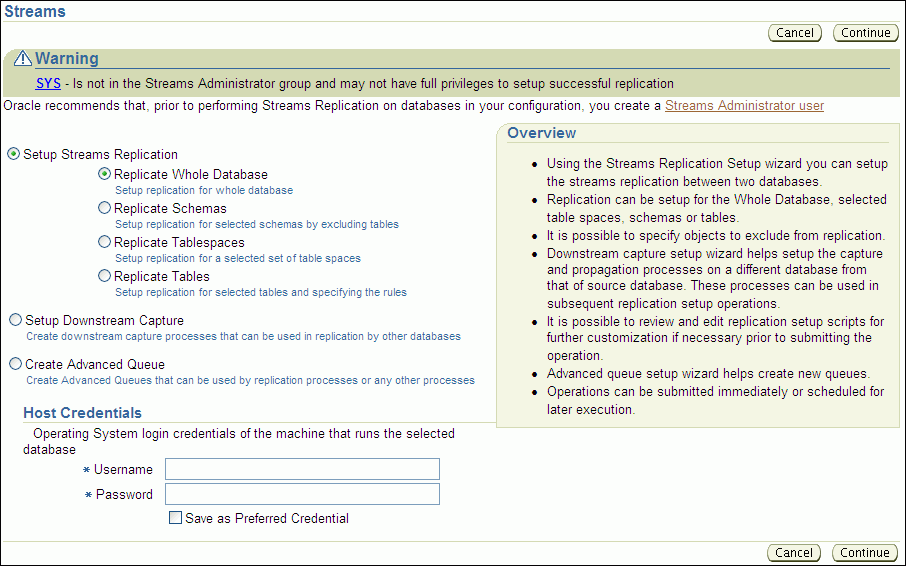
Click Streams Administrator user to open the Create Streams Administrator page.
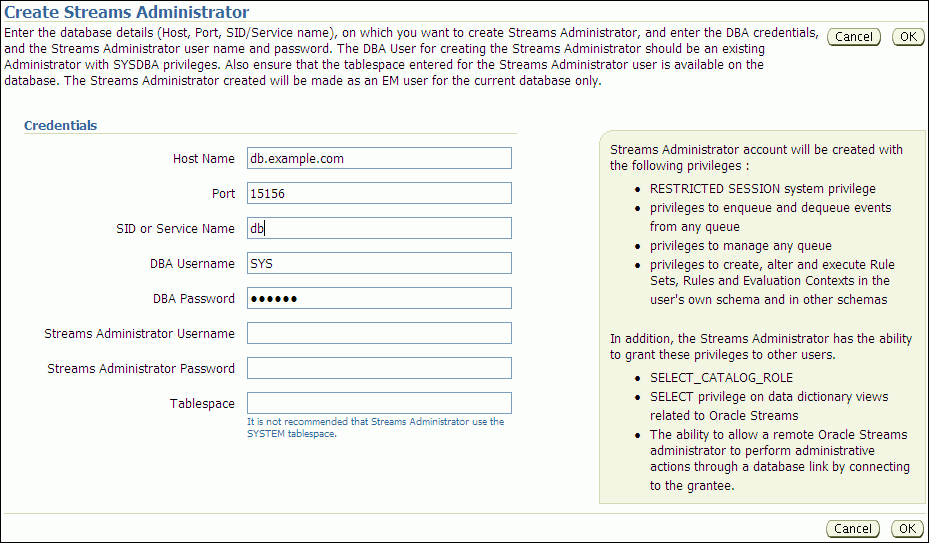
Complete the fields in the Credentials section:
In the Host Name field, enter the name of the host on which the database is running.
In the Port field, enter the port number for the database listener.
In the SID or Service Name field, enter the Oracle System Identifier (SID) or service name of the database.
In the DBA Username field, enter the username of an administrative user that can create users and grant privileges.
In the DBA Password field, enter the password for the DBA user.
In the Streams Administrator Username field, enter the username of the Oracle Streams administrator.
In the Streams Administrator Password field, enter the password for the new Oracle Streams administrator.
In the Tablespace field, enter streams_tbs. This tablespace was created in "Tutorial: Creating the Tablespace for the Oracle Streams Administrator".
You can identify the current database or a different database in the Host Name, Port, and SID or Service Name fields. The Oracle Streams administrator is created on the database you identify in these fields.
Click OK to finish configuring the Oracle Streams administrator.
If you were directed to this topic from another topic, then go back to the topic now:
"Tutorial: Configuring Two-Database Replication with Local Capture Processes"
"Tutorial: Configuring Two-Database Replication with a Downstream Capture Process"
"Tutorial: Configuring Hub-and-Spoke Replication with Local Capture Processes"
"Tutorial: Configuring Two-Database Replication with Synchronous Captures"
Queues store messages in an Oracle Streams environment. In an Oracle Streams replication environment, queues store messages that contain information about database changes. In an Oracle Streams messaging environment, queues store the messages produced and consumed by applications and users. Typically, each database in an Oracle Streams environment has one or more queues.
ANYDATA queues make it easy to store messages of almost any type. When you use an ANYDATA queue, you can, for example, store several different types of application messages in the same queue. Also, ANYDATA queues must be used to store information about database changes in an Oracle Streams replication environment.
To create an ANYDATA queue and its associated queue table:
In Oracle Enterprise Manager, log in to the database as the Oracle Streams administrator.
Go to the Database Home page.
Click Data Movement to open the Data Movement subpage.
On the Manage Advanced Queues page, click Create to open the Create Queue: Queue Type page.

Select Normal Queue, SYS.ANYDATA Datatype.
A queue of the ANYDATA data type enables you to store messages of almost any type in a single queue.
Click Continue to open the Create Queue: Normal Queue, SYS.ANYDATA Datatype page.
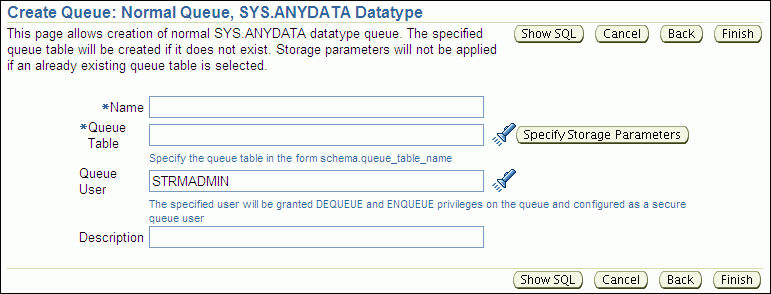
Enter the name of the queue in the Name field. A typical queue name used in Oracle Streams environments is streams_queue, but you can enter a different name.
Enter the name of the queue table owner and the queue table name in the Queue Table field. Typically, the Oracle Streams administrator owns Oracle Streams queues, and a typical queue table name is streams_queue_table. Therefore, you can enter strmadmin.streams_queue_table, or you can enter a different owner and name.
Ensure that the name of the Oracle Streams administrator is entered in the Queue User field.
Optionally enter a description for the queue in the Description field.
If you were directed to this topic from another topic, then go back to the topic now:
"Tutorial: Configuring Two-Database Replication with Synchronous Captures"
"Task 2: Configuring the Queues and Propagation Between Them"
See Also:
To establish a communication path between two locations in a distributed database environment, you must create a database link. A database link is a pointer that defines a one-way communication path from one database to another database. An Oracle database uses database links to enable users on one database to access objects in a remote database. A local user can use a database link to a remote database even if the local user is not a user on the remote database.
Database links are required in most environments that store data in multiple databases or share information between databases. These environment include those that use distributed SQL, Oracle Streams replication, materialized view replication, and messaging.
Because the GLOBAL_NAMES initialization parameter is set to TRUE for each database in your distributed environment, you must use a global database name when you establish a link between two databases. Doing so ensures that each database link connects to the correct remote database.
Before you can create a database link between two databases, you must configure network connectivity so that the databases can communicate with each other. See Oracle Database 2 Day DBA for information about configuring network connectivity between databases.
To create a database link from the ii1.example.com database to the ii2.example.com database:
Log in to Enterprise Manager as an administrative user, such as the Oracle Streams administrator strmadmin or SYSTEM. The database link is created in the schema of this user.
Go to the Database Home page for the ii1.example.com database instance.
Click Schema to open the Schema subpage.
Click Database Links in the Database Objects section.
On the Database Links page, click Create to open the Create Database Link page.
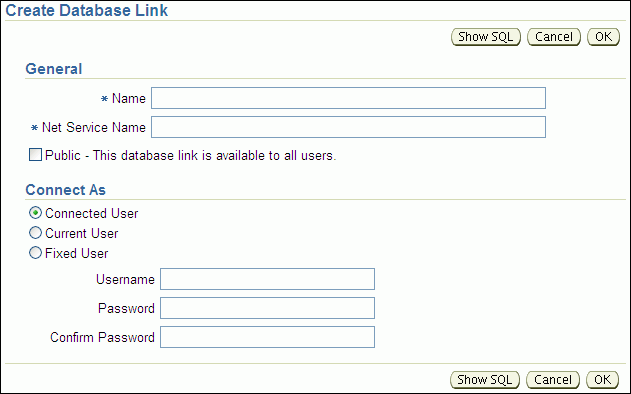
Enter the name of the database link in the Name field. The name must be the global name of the database to which you are linking. In this example, the database link name is ii2.example.com.
In the Net Service Name field, enter the net service name of the database to which you are linking. In this example, the net service name is ii2.example.com.
Select Fixed User in the Connect As section.
In the Username field, enter the user name of the user who will own the database link. The database link connects to this user on the remote database. In this example, you can enter an administrative user, such as system SYSTEM, the Oracle Streams administrator strmadmin, or a regular database user, such as oe.
In the Password and Confirm Password fields, enter the password for the specified user on the remote database.
Click OK to create the database link.
Note:
You can also use theCREATE DATABASE LINK SQL statement to create a database link.If you were directed to this topic from another topic, then go back to the topic now: