| Oracle® Warehouse Builder Data Modeling, ETL, and Data Quality Guide 11g Release 2 (11.2) Part Number E10935-05 |
|
|
PDF · Mobi · ePub |
| Oracle® Warehouse Builder Data Modeling, ETL, and Data Quality Guide 11g Release 2 (11.2) Part Number E10935-05 |
|
|
PDF · Mobi · ePub |
Use this chapter as a guide for creating ETL logic that meets your performance expectations.
This chapter contains the following topics:
This section addresses PL/SQL mapping design and includes:
Oracle Warehouse Builder generates code for PL/SQL mappings that meet the following criteria:
The output code of each operator satisfies the input code requirement of its next downstream operator.
If the mapping contains an operator that generates only PL/SQL output, all downstream data flow operators must also be implemented by PL/SQL. You can use SQL operators in such a mapping only after loading the PL/SQL output to a target.
As you design a mapping, you can evaluate its validity by examining the input and output code types for each operator in the mapping.
For example, you can see that the mapping in Figure 10-1 is invalid because the Match Merge operator MM generates PL/SQL output, but the subsequent Joiner operator accepts SQL input only.
Figure 10-1 Mapping Violates Input Requirement for Joiner Operator
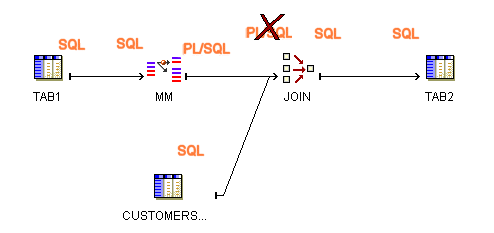
To achieve the desired results for the mapping, consider joining the source tables before performing the Match Merge or loading the results from the Match Merge to a staging table before performing the join.
Figure 10-2 displays a mapping in which source tables are joined before the match-merge operation. Figure 10-3 displays a mapping in which the results from the Match Merge operator are loaded into a staging table before performing the join.
Figure 10-2 Valid Mapping Design with Sources Joined Before Match Merge
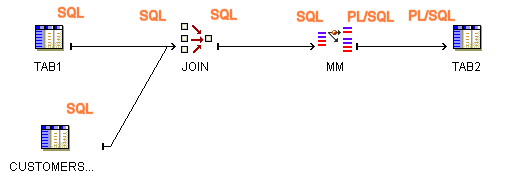
Figure 10-3 Valid Mapping Design with Staging Table

Table 10-1 and Table 10-2 list the implementation types for each Oracle Warehouse Builder operator. These tables also indicate whether PL/SQL code includes the operation associated with the operator in the cursor. This information is relevant in determining which operating modes are valid for a given mapping design. It also determines what auditing details are available during error handling.
Table 10-1 Source-Target Operators Implementation in PL/SQL Mappings
| Operator | Implementation Types | Valid in Set-Based Mode | Valid in Row-Based Mode | Valid in Row-Based (Target Only) |
|---|---|---|---|---|
|
Source Operators: Tables, Dimensions, Cubes, Views, External Tables |
SQL |
Yes |
Yes |
Yes. Part of cursor. |
|
Target Operators: Tables, Dimensions, Cubes, Views |
SQL PL/SQL |
Yes, unless loading= UPDATE and database is not 10g or higher. |
Yes |
Yes. Not part of cursor. |
|
Flat File as source |
For PL/SQL, create an external table. |
Yes |
Yes |
Yes. Part of the cursor. |
|
Flat File as target |
SQL |
Yes, unless loading = DELETE or loading= UPDATE and database is not 10g or higher. |
Yes |
Yes. Not part of cursor. |
|
Sequence as source |
SQL |
Yes |
Yes |
Yes, part of cursor. |
Table 10-2 Data Flow Operator Implementation in PL/SQL Mappings
| Operator Name | Implementation Types | Valid in Set-Based Mode | Valid in Row-Based Mode | Valid in Row-Based (Target Only) Mode |
|---|---|---|---|---|
|
Aggregator |
SQL |
Yes |
Yes, only if part of the cursor. |
Yes, only if part of the cursor. |
|
Constant Operator |
PL/SQL SQL |
Yes |
Yes |
Yes |
|
Data Generator |
SQL*Loader Only |
N/A |
N/A |
N/A |
|
Deduplicator |
SQL |
Yes |
Yes, only if part of the cursor |
Yes, only if part of the cursor. |
|
Expression |
SQL PL/SQL |
Yes |
Yes |
Yes |
|
Filter |
SQL PL/SQL |
Yes |
Yes |
Yes |
|
Joiner |
SQL |
Yes |
Yes, only if part of the cursor. |
Yes, only if part of the cursor. |
|
Lookup |
SQL PL/SQL |
Yes |
Yes, unless the All Rows option is selected on the Multiple Match Rows page of the Lookup operator. |
Yes, unless the All Rows option is selected on the Multiple Match Rows page of the Lookup operator. |
|
Mapping Input Parameter |
SQL PL/SQL |
Yes |
Yes |
Yes |
|
Mapping Output Parameter |
SQL PL/SQL |
Yes |
Yes |
Yes |
|
Match Merge |
SQL input PL/SQL output (PL/SQL input from XREF group only) |
No |
Yes |
Yes. Not part of cursor. |
|
Name and Address |
PL/SQL |
No |
Yes |
Yes. Not part of cursor. |
|
Pivot |
SQL PL/SQL |
Yes |
Yes |
Yes |
|
Post-Mapping Process |
Irrelevant |
Yes, independent of data flow |
Yes |
Yes |
|
Pre-Mapping Process |
Irrelevant |
Yes, independent of data flow |
Yes |
Yes |
|
Set |
SQL |
Yes |
Yes, only if part of the cursor. |
Yes, only if part of the cursor. |
|
Sorter |
SQL |
Yes |
Yes, only if part of the cursor. |
Yes, as part of the cursor. |
|
Splitter |
SQL PL/SQL |
Yes |
Yes |
Yes |
|
Table Function |
SQL or PL/SQL input SQL output only |
Yes |
Yes |
Yes |
|
Transformation as a procedure |
PL/SQL |
No |
Yes |
Yes. Not part of cursor. |
|
Transformation as a function that does not perform DML |
SQL PL/SQL |
Yes |
Yes |
Yes, included in the cursor. |
For mappings with a PL/SQL implementation, select one of the following operating modes:
Set-based fail over to row-based
Set-based fail over to row-based (target only)
The default operating mode that you select depends upon the performance that you expect, the amount of auditing data that you require, and how you design the mapping. Mappings have at least one and as many as three valid operating modes, excluding the options for failing over to row-based modes. During code generation, Oracle Warehouse Builder generates code for the specified default operating mode and for the deselected modes. Therefore, at run time, you can select to run in the default operating mode or any one of the other valid operating modes.
The types of operators in the mapping may limit the operating modes that you can select. As a general rule, mappings run in set-based mode can include any of the operators except for Match Merge, Name and Address, and Transformations used as procedures. Although you can include any of the operators in row-based and row-based (target only) modes, there are important restrictions on how you use SQL based operators such as Aggregators and Joins. To use SQL-based operators in either of the row-based modes, ensure that the operation associated with the operator can be included in the cursor.
These general rules are explained in the following sections.
In set-based mode, Oracle Warehouse Builder generates a single SQL statement that processes all data and performs all operations. Although processing data as a set improves performance, the auditing information available is limited. Runtime auditing is limited to reporting of the execution error only. With set-based mode, you cannot identify the rows that contain errors.
Figure 10-4 shows a simple mapping and the associated logic that Oracle Warehouse Builder uses to generate code for the mapping when run in set-based operating mode. TAB1, FLTR, and TAB2 are processed as a set using SQL.
Figure 10-4 Simple Mapping Run in Set-Based Mode
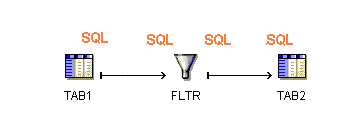
To correctly design a mapping for the set-based mode, avoid operators that require row- by-row processing such as Match Merge and Name and Address operators. If you include an operator in the data flow that cannot be performed in SQL, then Oracle Warehouse Builder does not generate set-based code and displays an error when you run the package in set-based mode.
For target operators in a mapping, the loading types INSERT/UPDATE and UPDATE/INSERT are always valid for set-based mode. Oracle Warehouse Builder supports UPDATE loading in set-based mode only with Oracle Database is 10g or later. Oracle Warehouse Builder also supports the loading type DELETE in set-based mode. For a complete listing of how Oracle Warehouse Builder handles operators in set-based mappings, see Table 10-2.
In row-based mode, Oracle Warehouse Builder generates statements that process data row by row. The select statement is in a SQL cursor. All subsequent statements are PL/SQL. You can access full run time auditing information for all operators performed in PL/SQL and only limited information for operations performed in the cursor.
Figure 10-5 shows a simple mapping and the associated logic that Oracle Warehouse Builder uses to generate code for the mapping when run in row-based operating mode. TAB1 is included in the cursor and processed as a set using SQL. FLTR and TAB2 are processed row by row using PL/SQL.
Figure 10-5 Simple Mapping Run in Row-Based Mode
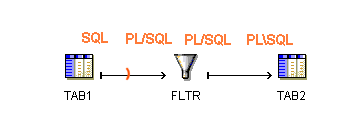
If the mapping includes any SQL-based operators that cannot be performed in PL/SQL, Oracle Warehouse Builder attempts to generate code with those operations in the cursor. To generate valid row-based code, design your mapping such that if you include any of the following SQL-based operators, Oracle Warehouse Builder can include the operations in the cursor:
Aggregation
Deduplicator
Joiner
Lookup
Sequence
Set
Sorter
For the preceding operators to be included in the cursor, do not directly precede it by an operator that generates PL/SQL code. In other words, you cannot run the mapping in row-based mode if it contains a Transformation implemented as a procedure, a Flat File used as a source, a Match Merge, or Name and Address operator directly followed by any of the seven SQL-based operators. For the design to be valid, include a staging table between the PL/SQL generating operator and the SQL-based operator.
In row-based (target only) mode, Oracle Warehouse Builder generates a cursor select statement and attempts to include as many operations as possible in the cursor. For each target, Oracle Warehouse Builder inserts each row into the target separately. You can access full run time auditing information for all operators performed in PL/SQL and only limited information for operations performed in the cursor. Use this mode when you expect fast set-based operations to extract and transform the data but need extended auditing for loading the data, which is where errors are likely to occur.
Figure 10-6 shows a simple mapping and the associated logic that Oracle Warehouse Builder uses to generate code for the mapping when run in row-based (target only) operating mode. TAB1 and FLTR are included in the cursor and processed as a set using SQL. TAB2 is processed row by row.
Figure 10-6 Simple Mapping Run in Row-Based (Target Only) Mode
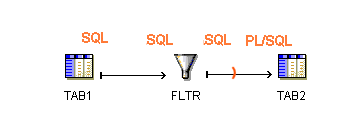
Row-based (target only) mode places the same restrictions on SQL-based operators as the row-based operating mode. Additionally, for mappings with multiple targets, Oracle Warehouse Builder generates code with a cursor for each target.
Note:
Release 11.2.0.3 and onwards, the feature Set Based Failover Row Based has been deprecated.There are two major approaches to committing data in Oracle Warehouse Builder. You can commit or rollback data based on the mapping design. Use one of the commit control methods described in "Committing Data Based on Mapping Design".
Alternatively, for PL/SQL mappings, you can commit or rollback data independently of the mapping design. Use a process flow to commit the data or establish your own method as described in "Committing Data Independently of Mapping Design".
By default, Oracle Warehouse Builder loads and then automatically commits data based on the mapping design. For PL/SQL mappings you can override the default setting and control when and how Oracle Warehouse Builder commits data. You have the following options for committing data in mappings:
Automatic: This is the default setting and is valid for all mapping types. Oracle Warehouse Builder loads and then automatically commits data based on the mapping design. If the mapping has multiple targets, then Oracle Warehouse Builder commits and rolls back each target separately and independently of other targets. Use the automatic commit when the consequences of multiple targets being loaded unequally are not great or are irrelevant.
Automatic correlated: Automatic correlated commit is a specialized type of automatic commit that applies to PL/SQL mappings with multiple targets only. Oracle Warehouse Builder considers all targets collectively and commits or rolls back data uniformly across all targets. Use the correlated commit when it is important to ensure that every row in the source affects all affected targets uniformly. For more information about automatic correlated commit, see "Committing Data from a Single Source to Multiple Targets".
Manual: Select manual commit control for PL/SQL mappings when you want to interject complex business logic, perform validations, or run other mappings before committing data. For examples, see "Embedding Commit Logic into the Mapping" and "Committing Data Independently of Mapping Design".
To populate multiple targets based on a common source, you may also want to ensure that every row from the source affects all targets uniformly.
Figure 10-7 shows a PL/SQL mapping that illustrates this case. The target tables all depend upon the source table. If a row from SOURCE causes changes in multiple targets (for instance TARGET_1 and TARGET_2), then Oracle Warehouse Builder should commit the appropriate data to both affected targets at the same time. If this relationship is not maintained when you run the mapping again, then the data can become inaccurate and possibly unusable.
Figure 10-7 Mapping with Multiple Targets Dependent on One Source
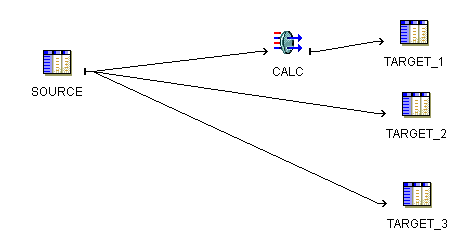
If the number of rows from the source table is relatively small, maintaining the three targets may not be difficult. Manually maintaining targets dependent on a common source, however, becomes more tedious as you increase the number of rows from the source, or as you design more complex mappings with more targets and transformations.
To ensure that every row in the source properly affects every target, configure the mapping to use the correlated commit strategy.
Using the Automatic Correlated Commit Strategy
In set-based mode, correlated commit may impact the size of your rollback segments. Space for rollback segments may be a concern when you merge data (insert/update or update/insert).
Correlated commit operates transparently with PL/SQL bulk processing code.
The correlated commit strategy is not available for mappings run in any mode that are configured for Partition Exchange Loading or that include a Queue, Match Merge, or Table Function operator.
The combination of the commit strategy and operating mode determines mapping behavior. Table 10-3 shows the valid combinations that you can select.
Table 10-3 Valid Commit Strategies for Operating Modes
| Operating Mode | Automatic Correlated Commit | Automatic Commit |
|---|---|---|
|
Set-based |
Valid |
Valid |
|
Row-based |
Valid |
Valid |
|
Row-based (target only) |
Not Applicable |
Valid |
Correlated commit is not applicable for row-based (target only). By definition, this operating mode places the cursor as close to the target as possible. In most cases, this results in only one target for each select statement and negates the purpose of committing data to multiple targets. If you design a mapping with the row-based (target only) and correlated commit combination, then Oracle Warehouse Builder runs the mapping but does not perform the correlated commit.
To understand the effects each operating mode and commit strategy combination has on a mapping, consider the mapping from Figure 10-7. Assume the data from source table equates to 1,000 new rows. When the mapping runs successfully, Oracle Warehouse Builder loads 1,000 rows to each of the targets. If the mapping fails to load the 100th new row to Target_2, then you can expect the following results, ignoring the influence from other configuration settings such as Commit Frequency and Number of Maximum Errors:
Set-based/ Correlated Commit: A single error anywhere in the mapping triggers the rollback of all data. When Oracle Warehouse Builder encounters the error inserting into Target_2, it reports an error for the table and does not load the row. Oracle Warehouse Builder rolls back all the rows inserted into Target_1 and does not attempt to load rows to Target_3. No rows are added to any of the target tables. For error details, Oracle Warehouse Builder reports only that it encountered an error loading to Target_2.
Row-based/ Correlated Commit: Beginning with the first row, Oracle Warehouse Builder evaluates each row separately and loads it to all three targets. Loading continues in this way until Oracle Warehouse Builder encounters an error loading row 100 to Target_2. Oracle Warehouse Builder reports the error and does not load the row. It rolls back the row 100 previously inserted into Target_1 and does not attempt to load row 100 to Target_3. Next, Oracle Warehouse Builder continues loading the remaining rows, resuming with loading row 101 to Target_1. Assuming Oracle Warehouse Builder encounters no other errors, the mapping completes with 999 new rows inserted into each target. The source rows are accurately represented in the targets.
Set-based/ Automatic Commit: When Oracle Warehouse Builder encounters the error inserting into Target_2, it does not load any rows and reports an error for the table. It does, however, continue to insert rows into Target_3 and does not roll back the rows from Target_1. Assuming Oracle Warehouse Builder encounters no other errors, the mapping completes with one error message for Target_2, no rows inserted into Target_2, and 1,000 rows inserted into Target_1 and Target_3. The source rows are not accurately represented in the targets.
Row-based/Automatic Commit: Beginning with the first row, Oracle Warehouse Builder evaluates each row separately for loading into the targets. Loading continues in this way until Oracle Warehouse Builder encounters an error loading row 100 to Target_2 and reports the error. Oracle Warehouse Builder does not roll back row 100 from Target_1, does insert it into Target_3, and continues to load the remaining rows. Assuming Oracle Warehouse Builder encounters no other errors, the mapping completes with 999 rows inserted into Target_2 and 1,000 rows inserted into each of the other targets. The source rows are not accurately represented in the targets.
For PL/SQL mappings only, you can embed commit logic into the mapping design by adding a Pre-Mapping Process or Post-Mapping Process operator with SQL statements to commit and rollback data. When you run the mapping, Oracle Warehouse Builder commits or rollback data based solely on the SQL statements you provide in the Pre-Mapping Process or Post-Mapping Process operator.
Use these instructions to implement a business rule that is tedious or impossible to design given existing Oracle Warehouse Builder mapping operators. For example, you may want to verify the existence of a single row in a target. Write the required logic in SQL and introduce that logic to the mapping through a pre or post mapping operator.
To include commit logic in the mapping design:
Design the mapping to include a Pre-Mapping Process or Post-Mapping Process operator. Use one of these operators to introduce commit and rollback SQL statements.
Configure the mapping with Commit Control set to Manual.
In the Projects Navigator, right-click the mapping and select Configure. Under Code Generation Options, select Commit Control to Manual.
To understand the implications of selecting to commit data manually, see "About Manual Commit Control".
Deploy the mapping.
Run the mapping.
Oracle Warehouse Builder runs the mapping but does not commit data until processing the commit logic you wrote in the Pre-Mapping Process or Post-Mapping Process operator.
You may want to commit data independently of the mapping design for any of the following reasons:
Running Multiple Mappings Before Committing Data: You may want to run multiple mappings without committing data until successfully running and validating all mappings. This can be the case when you have separate mappings for loading dimensions and cubes.
Maintaining targets more efficiently: If incorrect data is loaded and committed to a very large target, it can be difficult and time consuming to repair the damage. To avoid, first check the data and then decide whether to issue a commit or rollback command.
The first step to achieve these goals is to configure the mapping with commit control set to Manual.
Manual commit control enables you to specify when Oracle Warehouse Builder commits data regardless of the mapping design. Manual commit control does not affect auditing statistics. It means that you can view the number of rows inserted and other auditing information before issuing the commit or rollback command.
When using manual commit, be aware that this option may have performance implications. Mappings that you intend to run in parallel maybe be run serially if the design requires a target to be read after being loaded. This occurs when moving data from a remote source or loading to two targets bound to the same table.
When you enable manual commit control, Oracle Warehouse Builder runs the mapping with PEL switched off.
This section provides two sets of instructions for committing data independent of the mapping design. The first set describes how to run mappings and then commit data in a SQL*Plus session. Use these instructions to test and debug your strategy of running multiple mappings and then committing the data. Then, use the second set of instructions to automate the strategy.
Both sets of instructions rely upon the use of the main procedure generated for each PL/SQL mapping.
The main procedure is a procedure that exposes the logic for starting mappings in Oracle Warehouse Builder. You can employ this procedure in PL/SQL scripts or use it in interactive SQL*Plus sessions.
When you use the main procedure, you must specify one required parameter, p_status. And you can optionally specify other parameters relevant to the execution of the mapping as described in Table 10-4. Oracle Warehouse Builder uses the default setting for any optional parameters that you do not specify.
Table 10-4 Parameter for the Main Procedure
| Parameter Name | Description |
|---|---|
|
p_status |
Use this required parameter to write the status of the mapping upon completion. It operates with the predefined variable called status. The status variable is defined such that OK indicates the mapping completed without errors. OK_WITH_WARNINGS indicates the mapping completed with user errors. FAILURE indicates the mapping encountered a irrecoverable error. |
|
p_operating_mode |
Use this optional parameter to pass in the default operating mode such as SET_BASED. |
|
p_bulk_size |
Use this optional parameter to pass in the bulk size. |
|
p_audit_level |
Use this optional parameter to pass in the default audit level such as COMPLETE. |
|
p_max_no_of_errors |
Use this optional parameter to pass in the permitted maximum number of errors. |
|
p_commit_frequency |
Use this optional parameter to pass in the commit frequency. |
For PL/SQL mappings alone, you can run mappings and issue commit and rollback commands from the SQL*Plus session. Based on your knowledge of SQL*Plus and the "Main Procedure", you can manually run and validate multiple mappings before committing data.
To commit data manually at runtime:
Design the PL/SQL mappings. For instance, create one mapping to load dimensions and a separate mapping to load cubes.
These instructions are not valid for SQL*Loader and ABAP mappings.
Configure both mappings with the Commit Control parameter set to Manual.
In the Projects Navigator, right-click the mapping and select Configure. Under the Code Generation Options, set the Commit Control parameter to Manual.
Generate each mapping.
From a SQL*Plus session, issue the following command to run the first mapping called map1 in this example:
var status VARCHAR2(30);
execute map1.main(:status);
The first line declares the predefined status variable described in Table 10-4. In the second line, p_status is set to the status variable. When map1 completes, SQL*Plus displays the mapping status such as OK.
Run the second mapping, in this example, the cubes mapping called map2.
You can run the second in the same way you ran the previous map. Or, you can supply additional parameters listed in Table 10-4 to dictate how to run the map2 in this example:
map2.main (p_status => :status,               \
           p_operating_mode => 'SET_BASED',   \
           p_audit_level => 'COMPLETE');
Verify the results from the execution of the two mappings and send either the commit or rollback command.
Automate your commit strategy as described in "Committing Mappings through the Process Flow Editor".
For PL/SQL mappings alone, you can commit or rollback mappings. Based on your knowledge of the SQL*PLUS activity, the Main Procedure, and writing PL/SQL scripts, you can use process flows to automate logic that commits data after all mappings complete successfully or rollback the data if any mapping fails.
To commit multiple mappings through a process flow:
Design the PL/SQL mappings.
These instructions are not valid for SQL*Loader and ABAP mappings.
Ensure each mapping is deployed to the same schema.
All mappings must have their locations pointing to the same schema. You can achieve this by designing the mappings under the same target module. Or, for multiple target modules, ensure that the locations point to the same schema.
Configure each mapping with the Commit Control parameter set to Manual.
In the Projects Navigator, right-click the mapping and select Configure. Under Code Generation Options, set the Commit Control parameter to Manual.
Design a process flow using a SQL*PLUS activity instead of multiple mapping activities.
In typical process flows, you add a Mapping activity for each mapping and the process flow runs an implicit commit after each Mapping activity. However, in this design, do not add mapping activities. Instead, add a single SQL*PLUS activity.
Write a PL/SQL script that uses the main procedure to run each mapping. The following script demonstrates how to run the next mapping only if the initial mapping succeeds.
declare
    status VARCHAR2(30);
begin
    map1.main(status);
    if status != 'OK' then
       rollback;
    else
       map2.main(status);
       if status != 'OK' then
           rollback;
       else
           commit;
       end if;
    end if;
end;
Paste your PL/SQL script into the SQL*PLUS activity.
In the editor explorer, select SCRIPT under the SQL*PLUS activity and then double-click Value in the object inspector.
Optionally apply a schedule to the process flow as described in "Defining Schedules".
Deploy the mappings, process flow, and schedule if you defined one.
When you design mappings with multiple targets, you may want to ensure that Oracle Warehouse Builder loads the targets in a specific order. This is the case when a column in one target derives its data from another target.
To ensure referential integrity in PL/SQL mappings:
Design a PL/SQL mapping with multiple targets.
(Optional) Define a parent/child relationship between two of the targets by specifying a foreign key.
A foreign key in the child table must refer to a primary key in the parent table. If the parent does not have a column defined as a primary key, then you must add a column and set it as the primary key. For an example, see "Using Conventional Loading to Ensure Referential Integrity in SQL*Loader Mappings".
In the mapping properties, view the Target Load Order property by clicking the Ellipsis button to the right of this property.
If you defined a foreign key relationship in the previous step, Oracle Warehouse Builder calculates a default loading order that loads parent targets before children. If you did not define a foreign key, then use the Target Load Order dialog box to define the loading order.
For more information, see "Specifying the Order in Which Target Objects in a Mapping Are Loaded".
Ensure that the Use Target Load Ordering configuration parameter is set to its default value of true.
This section includes the following topics:
"Using Conventional Loading to Ensure Referential Integrity in SQL*Loader Mappings"
"Using Direct Path Loading to Ensure Referential Integrity in SQL*Loader Mappings"
If you are extracting data from a multiple-record-type file with a master-detail structure and mapping to tables, add a Sequence operator to the mapping to retain the relationship between the master and detail records through a surrogate primary key or foreign key relationship. A master-detail file structure is one where a master record is followed by its detail records. In Example 10-1, records beginning with "E" are master records with Employee information and records beginning with "P" are detail records with Payroll information for the corresponding employee.
Example 10-1 A Multiple-Record-Type Flat File with a Master-Detail Structure
E 003715 4 153 09061987 014000000 "IRENE HIRSH" 1 08500
P 01152000 01162000 00101 000500000 000700000
P 02152000 02162000 00102 000300000 000800000
E 003941 2 165 03111959 016700000 "ANNE FAHEY" 1 09900
P 03152000 03162000 00107 000300000 001000000
E 001939 2 265 09281988 021300000 "EMILY WELLMET" 1 07700
P 01152000 01162000 00108 000300000 001000000
P 02152000 02162000 00109 000300000 001000000
In Example 10-1, the relationship between the master and detail records is inherent only in the physical record order: payroll records correspond to the employee record they follow. However, if this is the only means of relating detail records to their masters, this relationship is lost when Oracle Warehouse Builder loads each record into its target table.
You can maintain the relationship between master and detail records if both types of records share a common field. If Example 10-1 contains a field Employee ID in both Employee and Payroll records, then you can use it as the primary key for the Employee table and as the foreign key in the Payroll table, thus associating Payroll records to the correct Employee record.
However, if your file does not have a common field that is required to join master and detail records, you must add a sequence column to both the master and detail targets (see Table 10-5 and Table 10-6) to maintain the relationship between the master and detail records. Use the Sequence operator to generate this additional value.
Table 10-5 represents the target table containing the master records from the file in Example 10-1. The target table for the master records in this case contains employee information. Columns E1-E10 contain data extracted from the flat file. Column E11 is the additional column added to store the master sequence number. Notice that the number increments by one for each employee.
Table 10-5 Target Table Containing Master Records
| E1 | E2 | E3 | E4 | E5 | E6 | E7 | E8 | E9 | E10 | E11 |
|---|---|---|---|---|---|---|---|---|---|---|
|
|
|
|
|
|
|
|
|
|
|
|
|
|
|
|
|
|
|
|
|
|
|
|
|
|
|
|
|
|
|
|
|
|
|
|
Table 10-6 represents the target table containing the detail records from the file in Example 10-1. The target table for the detail records in this case contains payroll information, with one or more payroll records for each employee. Columns P1-P6 contain data extracted from the flat file. Column P7 is the additional column added to store the detail sequence number. Notice that the number for each payroll record matches the corresponding employee record in Table 10-5.
Table 10-6 Target Table Containing Detail Records
| P1 | P2 | P3 | P4 | P5 | P6 | P7 |
|---|---|---|---|---|---|---|
|
|
|
|
|
|
|
|
|
|
|
|
|
|
|
|
|
|
|
|
|
|
|
|
|
P |
|
|
|
|
|
3 |
|
P |
|
|
|
|
|
3 |
This section contains instructions on creating a mapping that extracts records from a master-detail flat file and loads those records into two different tables. One target table stores master records and the other target table stores detail records from the flat file. The Mapping Sequence is used to maintain the master-detail relationship between the two tables.
Note:
These instructions are for conventional path loading. For instructions on using direct path loading for master-detail records, see "Using Direct Path Loading to Ensure Referential Integrity in SQL*Loader Mappings".This procedure outlines general steps for building such a mapping. Additional detailed instructions are available at:
To extract from a master-detail flat file and maintain master-detail relationships, use the following steps:
Import and sample the flat file source that consists of master and detail records.
When naming the record types as you sample the file, assign descriptive names to the master and detail records. This makes it easier to identify those records in the future.
In this example, for multi-record-type flat files, the Flat File Sample Wizard contains department and employee information. The master record type (for employee records) is called EmployeeMaster, while the detail record type (for payroll information) is called PayrollDetail.
Drop a Flat File operator onto the Mapping Editor canvas and specify the master-detail file from which you want to extract data.
Drop a Sequence operator onto the mapping canvas.
Drop a Table operator for the master records onto the mapping canvas.
You can either select an existing workspace table that you created earlier or create a new unbound Table operator with no attributes. You can then map or copy all required fields from the master record of the Flat File operator to the master Table operator (creating columns) and perform an outbound reconciliation to define the table later.
The table must contain all the columns required for the master fields you want to load plus an additional numeric column for loading sequence values.
Drop a Table operator for the detail records onto the mapping canvas.
You can either select an existing workspace table that you created earlier or create a new unbound Table operator with no attributes. You can then map or copy all required fields from the master record of the Flat File operator to the master Table operator (creating columns) and perform an outbound synchronize to define the table later.
The table must contain all the columns required for the detail fields you want to load plus an additional numeric column for loading sequence values.
Map all of the necessary flat file master fields to the master table and detail fields to the detail table.
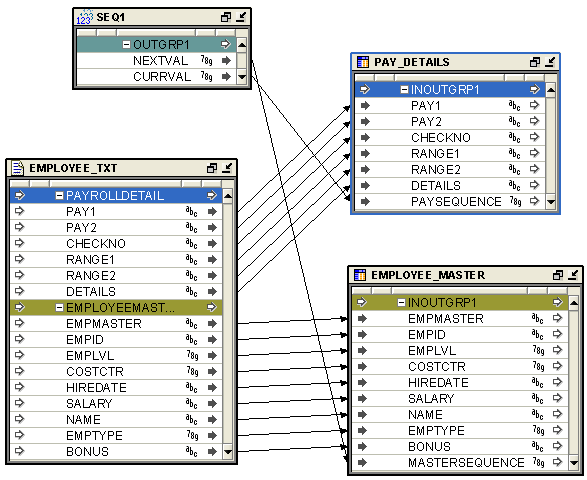
Figure 10-8 displays the mapping of the fields.
Map the Sequence NEXTVAL attribute to the additional sequence column in the master table.
Figure 10-8 displays the mapping from the NEXTVAL attribute of the Sequence operator to the master table.
Map the Sequence CURRVAL attribute to the additional sequence column in the detail table.
Figure 10-8 shows a completed mapping with the flat file master fields mapped to the master target table, the detail fields mapped to the detail target table, and the NEXTVAL and CURRVAL attributes from the Mapping Sequence mapped to the master and detail target tables, respectively.
Figure 10-8 Completed Mapping from Master-Detail Flat File to Two Target Tables
Configure the mapping that loads the source data into the target tables with the following parameters:
Direct Mode: Not selected
Errors Allowed: 0
Row: 1
Trailing Nullcols: True (for all tables)
This section contains error handling recommendations for files with varying numbers of errors.
If your data file almost never contains errors:
Create a mapping with a "Sequence Operator".
Configure a mapping with the following parameters:
Direct Mode= Not selected
ROW=1
ERROR ALLOWED = 0
Generate the code and run an SQL*Loader script.
If the data file has errors, then the loading stops when the first error occurs.
Fix the data file and run the control file again with the following configuration values:
CONTINUE_LOAD=TRUE
SKIP=number of records loaded
If your data file is likely to contain a moderate number of errors:
Create a primary key (PK) for the master record based on the seq_nextval column.
Create a foreign key (FK) for the detail record based on the seq_currval column which references the master table PK.
In this case, master records with errors is rejected with all their detail records. You can recover these records by following these steps.
Delete all failed detail records that have no master records.
Fix the errors in the bad file and reload only those records.
If there are very few errors, you may choose to load the remaining records and manually update the table with correct sequence numbers.
In the log file, you can identify records that failed with errors because those errors violate the integrity constraint. The following is an example of a log file record with errors:
Record 9: Rejected - Error on table "MASTER_T", column "C3".
ORA-01722: invalid number
Record 10: Rejected - Error on table "DETAIL1_T".
ORA-02291: integrity constraint (SCOTT.FK_SEQ) violated - parent key not found
Record 11: Rejected - Error on table "DETAIL1_T".
ORA-02291: integrity constraint (SCOTT.FK_SEQ) violated - parent key not found
Record 21: Rejected - Error on table "DETAIL2_T".
ORA-02291: invalid number
If your data file always contains many errors:
Load all records without using the Sequence operator.
Load the records into independent tables. You can load the data in Direct Mode, with the following parameters that increase loading speed:
ROW>1
ERRORS ALLOWED=MAX
Correct all rejected records.
Reload the file again with a "Sequence Operator".
After the initial loading of the master and detail tables, you can use the loaded sequence values to further transform, update, or merge master table data with detail table data. For example, if your master records have a column that acts as a unique identifier, such as an Employee ID, and you want to use it as the key to join master and detail rows (instead of the sequence field you added for that purpose), you can update the detail tables to use this unique column. You can then drop the sequence column you created for the initial load. Operators such as the Aggregator, Filter, or Match Merge operator can help you with these subsequent transformations.
If you are using a master-detail flat file where the master record has a unique field (or if the concatenation of several fields can result in a unique identifier), you can use Direct Path Load as an option for faster loading.
For direct path loading, the record number (RECNUM) of each record is stored in the master and detail tables. A post-load procedure uses the RECNUM to update each detail row with the unique identifier of the corresponding master row.
This procedure outlines general steps for building such a mapping. Additional detailed instructions are available:
For additional information about importing flat file sources, see Oracle Warehouse Builder Sources and Targets Guide.
For additional information about using flat files as a source, "Flat File Operator".
For additional information about using Table operators, see "Using the Add Operator Dialog Box to Add Operators".
For additional information about using the Data Generator operator, see "Data Generator Operator".
For additional information about using the Constant operator, see "Constant Operator".
For additional information about configuring mappings, see "Configuring Mappings Reference".
To extract from a master-detail flat file using direct path load to maintain master-detail relationships:
Import and sample a flat file source that consists of master and detail records.
When naming the record types as you sample the file, assign descriptive names to the master and detail records. This helps in identifying those records in the future.
Create a mapping that you use to load data from the flat file source.
Drop a Flat File operator onto the mapping canvas and specify the master-detail file from which you want to extract data.
Drop a Data Generator and a Constant operator onto the mapping canvas.
Drop a Table operator for the master records onto the mapping canvas.
You can either select an existing workspace table that you created earlier, or create a new unbound Table operator with no attributes and perform an outbound synchronize to define the table later.
The table must contain all the columns required for the master fields you plan to load plus an additional numeric column for loading the RECNUM value.
Drop a Table operator for the detail records onto the mapping canvas.
You can either select an existing workspace table that you created earlier, or create a new unbound Table operator with no attributes and perform an outbound synchronize to define the table later.
The table must contain all the columns required for the detail fields you plan to load plus an additional numeric column for loading a RECNUM value, and a column that is updated with the unique identifier of the corresponding master table row.
Map all of the necessary flat file master fields to the master table and detail fields to the detail table.
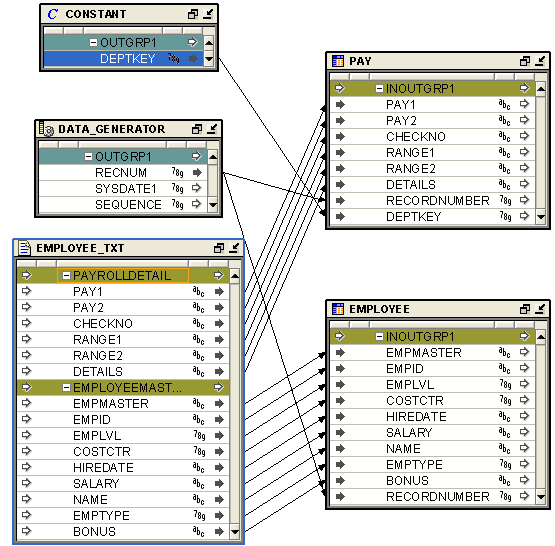
Figure 10-9 displays this mapping of master and detail fields.
Map the Data Generator operator's RECNUM attribute to the RECNUM columns in the master and detail tables.
Figure 10-9 displays the mapping in which the RECNUM attribute of the Data Generator operator is mapped to the RECORDNUMBER table attribute.
Add a constant attribute in the Constant operator.
If the master row unique identifier column is of CHAR data type, in the Property Inspector of the constant attribute, set the Data type property to CHAR and the Expression property to asterisk (*).
If the master row unique identifier column is a number, in the Property Inspector of the constant attribute, set the Data type property to NUMBER and the Expression property to zero. This marks all data rows as "just loaded".
Map the constant attribute from the Constant operator to the detail table column that later stores the unique identifier for the corresponding master table record.
Figure 10-9 shows a completed mapping with the flat file's master fields mapped to the master target table, the detail fields mapped to the detail target table, the RECNUM attributes from the Data Generator operator mapped to the master and detail target tables, respectively, and the constant attribute mapped to the detail target table.
Figure 10-9 Completed Mapping from Master-Detail Flat File with a Direct Path Load
Configure the mapping with the following parameters:
Direct Mode: True
Errors Allowed: 0
Trailing Nullcols: True (for each table)
After you validate the mapping and generate the SQL*Loader script, create a post-update PL/SQL procedure and add it to Oracle Warehouse Builder library.
Run the SQL*Loader script.
Run an UPDATE SQL statement by running a PL/SQL post-update procedure or manually executing a script.
The following is an example of the generated SQL*Loader control file script:
OPTIONS ( DIRECT=TRUE,PARALLEL=FALSE, ERRORS=0, BINDSIZE=50000, ROWS=200, READSIZE=65536)
LOAD DATA
CHARACTERSET WE8MSWIN1252
  INFILE 'g:\FFAS\DMR2.dat'
  READBUFFERS 4
  INTO TABLE "MATER_TABLE"
  APPEND
  REENABLE DISABLED_CONSTRAINTS
       WHEN
        "REC_TYPE"='P'
  FIELDS
    TERMINATED BY ','
                OPTIONALLY ENCLOSED BY '"'
                TRAILING NULLCOLS

                (
                "REC_TYPE" POSITION (1) CHAR ,
                "EMP_ID" CHAR ,
                "ENAME" CHAR ,
                "REC_NUM" RECNUM
                )

INTO TABLE "DETAIL_TABLE"
                APPEND
                REENABLE DISABLED_CONSTRAINTS
                WHEN
                "REC_TYPE"='E'
                FIELDS
                TERMINATED BY ','
                OPTIONALLY ENCLOSED BY '"'
                TRAILING NULLCOLS
        (
                "REC_TYPE" POSITION (1) CHAR ,
                "C1" CHAR ,
                "C2" CHAR ,
                "C3" CHAR ,
                "EMP_ID" CONSTANT '*',
         "REC_NUM" RECNUM
The following is an example of the post-update PL/SQL procedure:
create or replace procedure wb_md_post_update(
     master_table varchar2
    ,master_recnum_column varchar2
    ,master_unique_column varchar2
    ,detail_table varchar2
    ,detail_recnum_column varchar2
    ,detail_masterunique_column varchar2
    ,detail_just_load_condition varchar2)
  IS
     v_SqlStmt VARCHAR2(1000);
  BEGIN
     v_SqlStmt := 'UPDATE '||detail_table||' l '||
                  ' SET l.'||detail_masterunique_column||' = (select i.'||master_unique_column||
                  ' from '||master_table||' i '||
                  ' WHERE i.'||master_recnum_column||' IN '||
                  ' (select max(ii.'||master_recnum_column||') '||
                  ' from '||master_table||' ii '||
                  ' WHERE ii.'||master_recnum_column||' < l.'||detail_recnum_column||') '||
                  ' ) '||
                  ' WHERE l.'||detail_masterunique_column||' = '||''''||detail_just_load_condition||'''';
     dbms_output.put_line(v_sqlStmt);
     EXECUTE IMMEDIATE  v_SqlStmt;
  END;
  /
Data partitioning can improve performance when loading or purging data in a target system. This practice is known as Partition Exchange Loading (PEL).
PEL is recommended when loading a relatively small amount of data into a target containing a much larger volume of historical data. The target can be a table, a dimension, or a cube in a data warehouse.
This section includes the following topics:
By manipulating partitions in your target system, you can use Partition Exchange Loading (PEL) to instantly add or delete data. When a table is exchanged with an empty partition, new data is added.
You can use PEL to load new data by exchanging it into a target table as a partition. For example, a table that holds the new data assumes the identity of a partition from the target table and this partition assumes the identity of the source table. This exchange process is a DDL operation with no actual data movement.
Figure 10-10 illustrates an example of PEL. Data from a source table Source is inserted into a target table consisting of four partitions (Target_P1, Target_P2, Target_P3, and Target_P4). If the new data is loaded into Target_P3, then the partition exchange operation only exchanges the names on the data objects without moving the actual data. After the exchange, the formerly labeled Source is renamed to Target_P3, and the former Target_P3 is now labeled as Source. The target table still contains four partitions: Target_P1, Target_P2, Target_P3, and Target_P4. The partition exchange operation available in Oracle 9i completes the loading process without data movement.
Figure 10-10 Overview of Partition Exchange Loading

To configure a mapping for partition exchange loading, complete the following steps:
In the Projects Navigator, right-click a mapping and select Configure.
Oracle Warehouse Builder displays the Configuration tab for the mapping.
By default, PEL is disabled for all mappings. Select PEL Enabled to use Partition Exchange Loading.
Use Data Collection Frequency to specify the amount of new data to be collected for each run of the mapping. Set this parameter to specify if you want the data collected by Year, Quarter, Month, Day, Hour, or Minute. This determines the number of partitions.
Select Direct to create a temporary table to stage the collected data before performing the partition exchange. If you do not select this parameter, then Oracle Warehouse Builder directly swaps the source table into the target table as a partition without creating a temporary table. For more information, see "Direct and Indirect PEL".
If you select Replace Data, Oracle Warehouse Builder replaces the existing data in the target partition with the newly collected data. If you do not select it, then Oracle Warehouse Builder preserves the existing data in the target partition. The new data is inserted into a non-empty partition. This parameter affects the local partition and is required to remove or swap a partition out of a target table. At the table level, you can set Truncate/Insert properties.
When you use Oracle Warehouse Builder to load a target by exchanging partitions, you can load the target indirectly or directly.
Indirect PEL: By default, Oracle Warehouse Builder creates and maintains a temporary table that stages the source data before initiating the partition exchange process. For example, use Indirect PEL when the mapping includes a remote source or a join of multiple sources.
Direct PEL: You design the source for the mapping to match the target structure. For example, use Direct PEL in a mapping to instantaneously publish fact tables that you loaded in a mapping that is run before.
If you design a mapping using PEL and it includes remote sources or a join of multiple sources, Oracle Warehouse Builder must perform source processing and stage the data before partition exchange can proceed. Therefore, configure such mappings with Direct PEL set to False. Oracle Warehouse Builder transparently creates and maintains a temporary table that stores the results from source processing. After performing the PEL, Oracle Warehouse Builder drops the table.
Figure 10-11 shows a mapping that joins two sources and performs an aggregation. If all new data loaded into the ORDER_SUMMARY table is always loaded into same partition, then you can use Indirect PEL on this mapping to improve load performance. In this case, Oracle Warehouse Builder transparently creates a temporary table after the Aggregator and before ORDER_SUMMARY.
Figure 10-11 Mapping with Multiple Sources
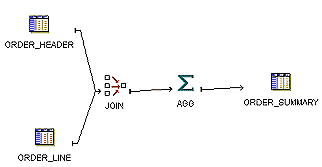
Oracle Warehouse Builder creates the temporary table using the same structure as the target table with the same columns, indexes, and constraints. For the fastest performance, Oracle Warehouse Builder loads the temporary table using parallel direct-path loading INSERT. After the INSERT, Oracle Warehouse Builder indexes and constrains the temporary table in parallel.
Use Direct PEL when the source table is local and the data is of good quality. You must design the mapping such that the source and target are in the same database and have the same structure. The source and target must have the same indexes and constraints, the same number of columns, and the same column types and lengths.
For example, assume that you have the same mapping from Figure 10-11 but would like greater control on when data is loaded into the target. Depending on the amount of data, it could take hours to load and you would not know precisely when the target table would be updated.
To instantly load data to a target using Direct PEL:
Design one mapping to join source data, if necessary, transform data, ensure data validity, and load it to a staging table. Do not configure this mapping to use PEL.
Design the staging table to exactly match the structure of the final target that you load in a separate mapping.
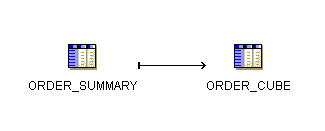
For example, the staging table in Figure 10-11 is ORDER_SUMMARY and should be of the same structure as the final target, ORDER_CUBE in Figure 10-12.
Create a second mapping that loads data from the staging table to the final target. Configure this mapping to use Direct PEL.
Figure 10-12 displays the mapping that loads data from the staging table to the final target.
Figure 10-12 Publish_Sales_Summary Mapping
Use either Oracle Warehouse Builder Process Flow Editor or Oracle Workflow to start the second mapping after the completion of the first.
You can use PEL effectively for scalable loading performance if the following conditions are true:
Table partitioning and tablespace: The target table must be Range partitioned by one DATE column. All partitions must be created in the same tablespace. All tables are created in the same tablespace.
Existing historical data: The target table must contain a huge amount of historical data. An example use for PEL is for a click stream application where the target collects data every day from an OLTP database or Web log files. New data is transformed and loaded into the target that contains historical data.
New data: All new data must to be loaded into the same partition in a target table. For example, if the target table is partitioned by day, then the daily data should be loaded into one partition.
Loading Frequency: The loading frequency should be equal to or less than the data collection frequency.
No global indexes: There must be no global indexes on the target table.
To configure targets in a mapping for PEL:
Oracle Warehouse Builder does not automatically create partitions during run time. Before you can use PEL, you must create all partitions as described in "Defining Partitions".
For example, if you select Month as the frequency of new data collection, you must create all the required partitions for each month of new data. Use the object editors to create partitions for a table, dimension, or cube.
To use PEL, all partition names must follow a naming convention. For example, for a partition that holds data for May 2002, the partition name must be in the format Y2002_Q2_M05.
For PEL to recognize a partition, its name must fit one of the following formats:
Ydddd
Ydddd_Qd
Ydddd_Qd_Mdd
Ydddd_Qd_Mdd_Ddd
Ydddd_Qd_Mdd_Ddd_Hdd
Ydddd_Qd_Mdd_Ddd_Hdd_Mdd
Where d represents a decimal digit. All the letters must be in upper case. Lower case is not recognized.
If you correctly name each partition, Oracle Warehouse Builder automatically computes the Value Less Than property for each partition. Otherwise, you must manually configure Value Less Than for each partition for Oracle Warehouse Builder to generate a DDL statement. The following is an example of a DDL statement generated by Oracle Warehouse Builder:
. . .
PARTITION A_PARTITION_NAME
      VALUES LESS THAN (TO_DATE('01-06-2002','DD-MM-YYYY')),
. . .
Add an index (ORDER_SUMMARY_PK_IDX) to the ORDER_SUMMARY table. This index has two columns, ORDER_DATE and ITEM_ID. Set the following on the Indexes tab of the Table Editor:
Select UNIQUE in the Type column.
Select LOCAL in the Scope column.
Now Oracle Warehouse Builder can generate a DDL statement for a unique local index on table ORDER_SUMMARY.
Using local indexes provides the most important PEL performance benefit. Local indexes require all indexes to be partitioned in the same way as the table. When the temporary table is swapped into the target table using PEL, so are the identities of the index segments.
If an index is created as a local index, the Oracle server requires that the partition key column must be the leading column of the index. In the preceding example, the partition key is ORDER_DATE and it is the leading column in the index ORDER_SUMMARY_PK_IDX.
In this step you must specify that all primary key and unique key constraints are created with the USING INDEX option. In the Projects Navigator, right-click the table and select Configure. The Configuration tab for the table is displayed. Select the primary or unique key in the left panel and select Using Index in the right panel.
With the USING INDEX option, a constraint does not triggers automatic index creation when it is added to the table. The server searches existing indexes for an index with same column list as that of the constraint. Thus, each primary or unique key constraint must be backed by a user-defined unique local index. The index required by the constraint ORDER_SUMMARY_PK is ORDER_SUMMARY_PK_IDX which was created in "Step 2: Create All Indexes Using the LOCAL Option".
These are the restrictions for using PEL in Oracle Warehouse Builder:
Only One Date Partition Key: Only one partition key column of DATE data type is enabled. Numeric partition keys are not supported in Oracle Warehouse Builder.
Only Natural Calendar System: The current PEL method supports only the natural calendar system adopted worldwide. Specific business calendar systems with user-defined fiscal and quarter endings are currently not supported.
All Data Partitions Must Be In the Same Tablespace: All partitions of a target (table, dimension, or cube) must be created in the same tablespace.
All Index Partitions Must Be In the Same Tablespace: All indexes of a target (table, dimension, or cube) must be created in the same tablespace. However, the index tablespace can be different from the data tablespace.
Although you can design mappings to access remote sources through database links, performance is likely to be slow when you move large volumes of data. For mappings that move large volumes of data between sources and targets of the same Oracle Database version, you have an option for dramatically improving performance with transportable modules.
See Also:
"Moving Large Volumes of Data Using Transportable Modules" for instructions on using transportable modules.You can also efficiently extract data from remote Oracle or other heterogeneous database sources using Code Template (CT) mappings. Oracle Warehouse Builder provides a set of predefined Code Templates that you can use in CT mappings for different data movement options.
See Also:
"Creating Code Template (CT) Mappings" for information about defining and using CT mappings.
"About Prebuilt Code Templates Shipped with Oracle Warehouse Builder" for a description of the Code Templates shipped with Oracle Warehouse Builder.