| Oracle® Warehouse Builder Installation and Administration Guide 11g Release 2 (11.2) Part Number E17130-05 |
|
|
PDF · Mobi · ePub |
| Oracle® Warehouse Builder Installation and Administration Guide 11g Release 2 (11.2) Part Number E17130-05 |
|
|
PDF · Mobi · ePub |
This section describes how to configure the Repository Browser environment within Oracle Warehouse Builder, and Control Center Agent for Oracle Application Server. Procedures for installing optional components are also described.
This section includes the following topics:
The Repository Browser connects to Oracle Warehouse Builder repositories and enables you to view metadata, run Web reports, perform lineage and impact analysis on your metadata, and audit run-time executions.
When you install Oracle Warehouse Builder from Oracle Universal Installer, the Repository Browser is also installed and runs in all the languages that you selected during installation.
To verify the installation, start the Repository Browser listener and then the Repository Browser. For information on how to use the Repository Browser, refer to Oracle Warehouse Builder Data Modeling, ETL, and Data Quality Guide.
By default, Repository Browser sessions time out after one hour of inactivity. To change, edit the web.xml file located at OWB_HOME\owb\j2ee\applications\owbb\WEB-INF by updating the session-config tag.
By default, the tag displays as follows:
<session-config>
<session-timeout>60</session-timeout>
</session-config>
The procedures in this section describe how to install and configure Control Center Agent to run in Oracle Application Server. This section includes the following topics:
"Configuring the Control Center Agent Web Service (jrt-web.war)"
"Installing Code Templates for Use from Control Center Agent"
This section describes how to modify the OC4J startup script.
To modify the OC4J startup script:
Ensure that you are in the application server configuration directory, AS_HOME/opmn/config. AS_HOME stands for the root home directory of the application server.
Alter the contents of the file as demonstrated in the following example, where bold font indicates the edits you must make.
Setting MaxPermSize parameter at 128M allocates enough PermGen space to OC4J to run the Control Center Agent.
The Python.path sets the path for the Python library files used by the Control Center Agent: jython_lib.zip and jython_owblib.jar. These two files are in the OWB_HOME/owb/lib/int directory.
The km_security_needed property determines if restrictions are applied to the types of operating system commands enabled by Oracle Warehouse Builder Code Template script that runs in the Control Center Agent. Setting it to true enforces restrictions.
To review the list of commands allowed by this security mechanism, check the file AS_HOME/j2ee/home/config/ct_permissions.properties (it can be specified in the jrt.xml configuration file), which is available after Control Center Agent successfully installs in the OC4J in Application Server.
<ias-component id="default_group">
  <process-type id="home" module-id="OC4J" status="enabled">
  <module-data>
  <category id="start-parameters">
  <data id="java-options" value="-server
    -XX:MaxPermSize=128M
    -ms512M -mx1024M
    -XX:AppendRatio=3
    -Dpython.path=/home/lib/jython_lib.zip:/home/lib/jython_owblib.jar
    -Dkm_security_needed=true
...
 </ias-component>
To set up the Control Center Agent server-side logging:
Ensure that you are in the OC4J server configuration directory, OC4J_HOME/j2ee/home/config/. OC4J_HOME stands for the root home directory of the OC4J.
Alter the contents of the file as demonstrated in the following example, where bold font indicates the edits you must make.
In the log handler section, the jrt-internal-log-handler is the handler used by Control Center Agent run-time logger to create log files.
In the logger section, you are creating the logger for Control Center Agent run-time auditing.
<!-- The log handler used by JRT run-time logger -->
<log_handler name="jrt-internal-log-handler"   class="oracle.core.ojdl.logging.ODLHandlerFactory">
    <property name="path" value="../log"/>
    <property name="maxFileSize" value="10485760"/>
    <property name="maxLogSize" value="104857600"/>
    <property name="encoding" value="UTF-8"/>
</log_handler>
...
<!-- The JRT run-time logger for run-time auditing -->
<logger name="oracle.wh.jrt.server.audit" level="ALL"
   useParentHandlers="false">
    <handler name="jrt-internal-log-handler"/>
</logger>
To configure the audit data source:
Ensure that you are in the OC4J server configuration directory, OC4J_HOME/j2ee/home/config/. OC4J_HOME stands for the root home directory of the OC4J.
Define the audit data source as demonstrated in the following example, where bold font indicates the edits you must make.
<managed-data-source name="AuditDS" connection-pool-name="OWBSYS Audit
  Connection Pool" jndi-name="jdbc/AuditDS"/>
<connection-pool name="Oracle Audit Connection Pool">
  <connection-factory factory-class="oracle.jdbc.pool.OracleDataSource"
    user="username" password="password"
    url="jdbc:oracle:thin:@//localhost:1521/ORCL"/>
</connection-pool>
To configure Control Center Agent security roles:
In a Web browser, navigate to the Enterprise Manager home page.
Log in using the oc4jadmin credentials. You may be prompted to activate the oc4jadmin account. If prompted to activate the account:
Create a password for the oc4jadmin account to activate it. Enter the password you want to use. Confirm the password and click OK to activate the account.
On the Cluster Topology page, locate the link to the OC4J instance installed under the Application Server.
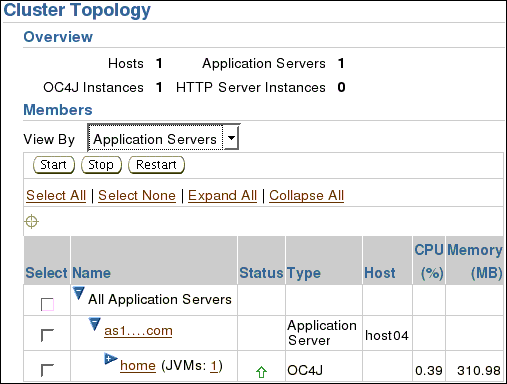
Click home (the OC4J instance).
This takes you to the home page of the OC4J instance.
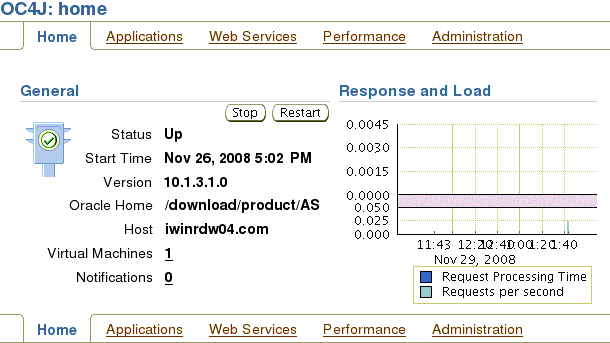
On the OC4J home screen, click the Administration tab.
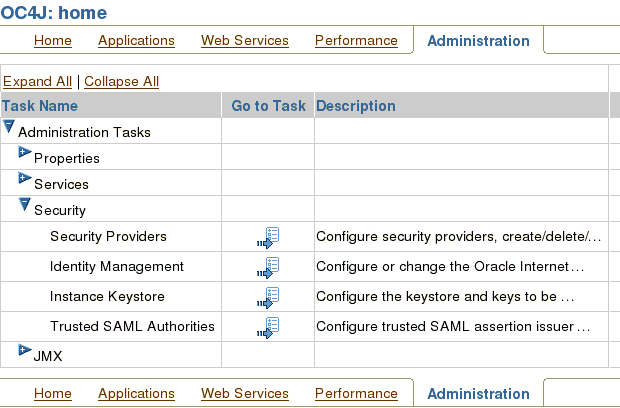
On the Administration Tasks screen, expand Security.
Click the task icon next to Security Providers.
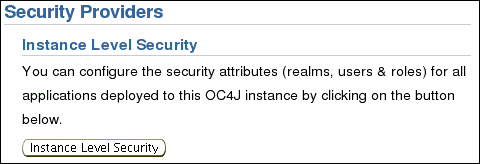
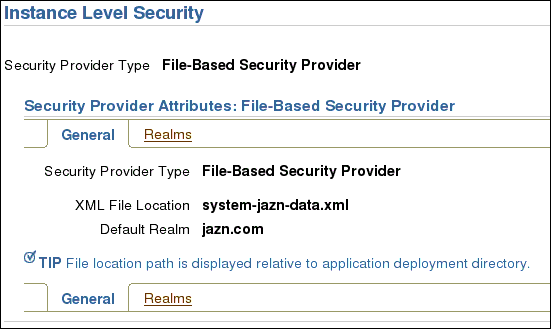
On Security Providers screen, click Instance Level Security.
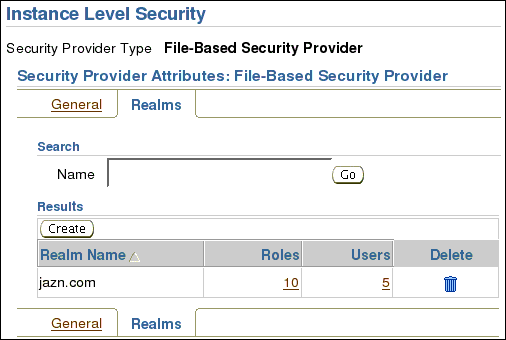
On Instance Level Security screen, click the Realms tab.
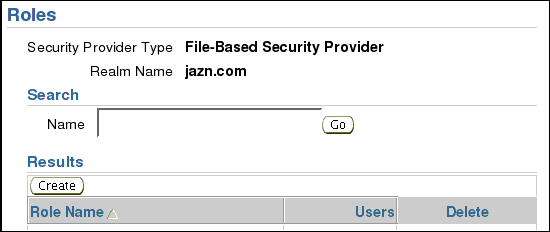
Under the Realms tab, in the default realm jazn.com, click the number in Roles column.
On the Roles screen, click Create.
On the Add Role screen, enter Name OWB_J2EE_EXECUTOR.
Click OK.

On the Add Role screen, enter Name OWB_J2EE_OPERATOR.
Click OK.

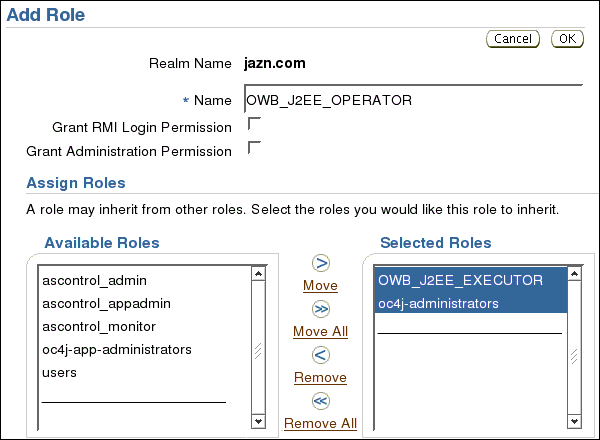
On the Add Role screen, enter Name OWB_J2EE_OPERATOR.
Under Assign Roles, in the list of Available Roles, select OWB_J2EE_EXECUTOR and oc4j-administrators, and move to the list of Selected Roles.
Click OK.
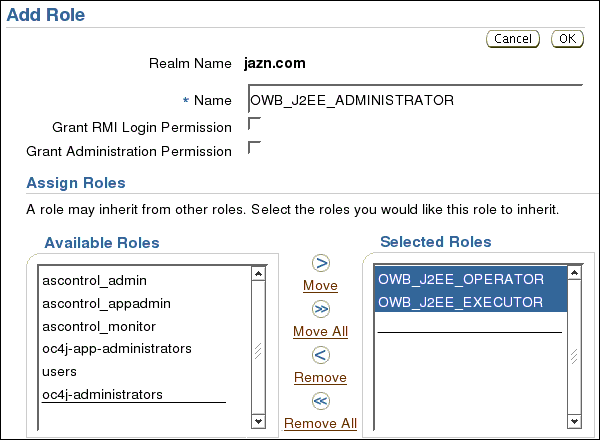
On the Add Role screen, enter Name OWB_J2EE_ADMINISTRATOR.
Under Assign Roles, in the list of Available Roles, select OWB_J2EE_OPERATOR and OWB_J2EE_EXECUTOR, and move to the list of Selected Roles.
Click OK.
Under the Realms tab, in the default realm jazn.com, click the number in Users column.
On the Users screen, click user oc4jadmin.
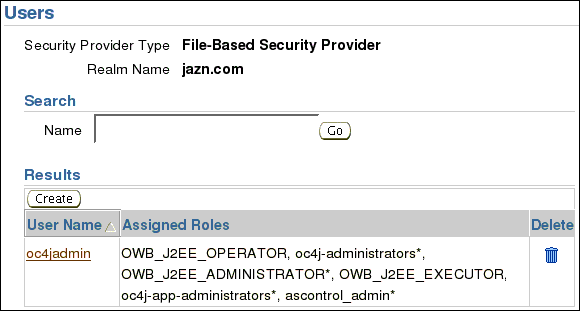
Under Assign Roles, in the list of Available Roles, select OWB_J2EE_ADMINISTRATOR and oc4j_app_administrators, and move to the list of Selected Roles.
Click Apply.
On the breadcrumb, click Instance Level Security.
Under the Realms tab, in the default realm jazn.com, click the number in Roles column.
Click Create.
On the Add Role screen, enter Name OWB_INTERNAL_USERS.
Click OK.
You must create two JMS queues, for JRT:owbQueue, and for JRT:owb_abortQueue.
On the breadcrumb, click OC4J:home.
On the OC4J:home screen, click the Administration tab.
Expand Services, and then expand Enterprise Messaging Service.
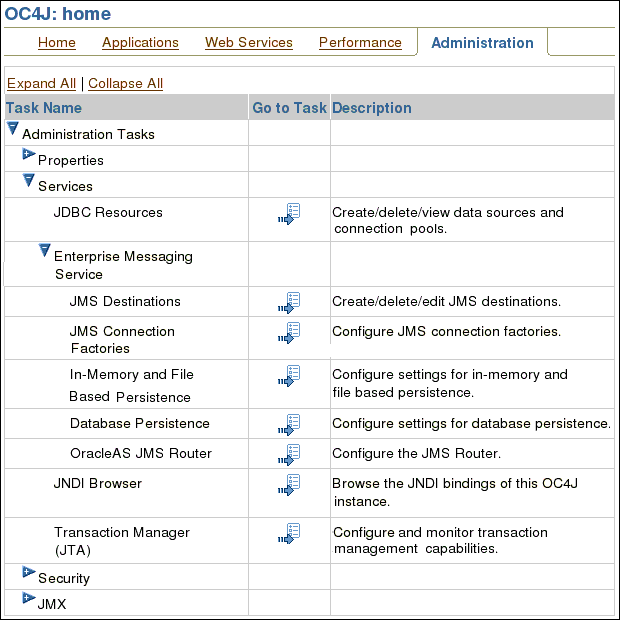
On JMS Destinations screen, click Create New.

On Add Destination screen, choose Destination Type Queue, enter Destination Name owbQueue, select Persistence In Memory Persistence Only, and enter JNDI Location jms/owbQueue.
Click OK.
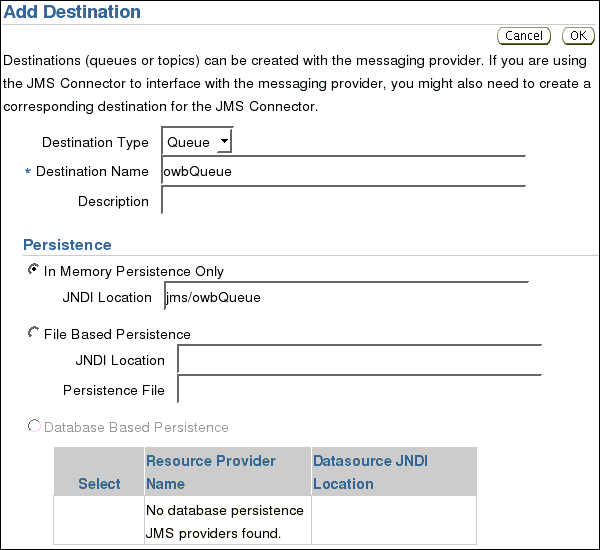
On Add Destination screen, choose Destination Type Queue, enter Destination Name owb_abortQueue, select Persistence In Memory Persistence Only, and enter JNDI Location jms/owb_abortQueue.
Click OK.
To ensure that system commands such as linux ls, sh, and so on, can run normally in scripts within the Control Center Agent, the environment variable PATH must be hold the directory that contains the system commands.
To set the PATH environment variable:
On the breadcrumb, click OC4J:home.
On the OC4J:home screen, click the Administration tab.
Expand Administration Tasks, then expand Properties.
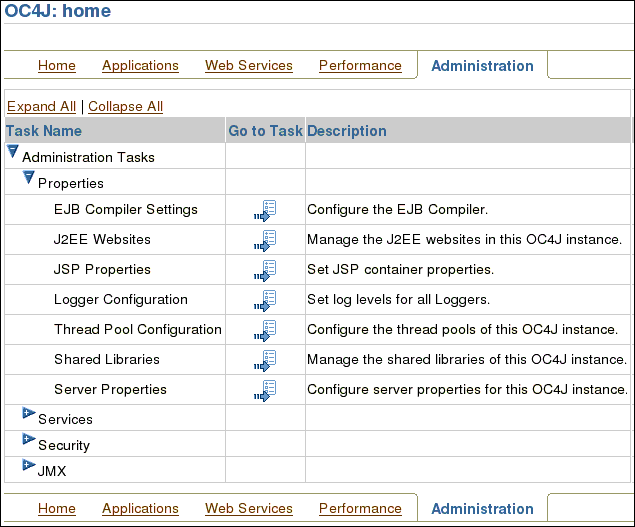
Click the task icon next to Server Properties.
On the Server Properties screen, scroll downwards to Environment Variables section.
Under Environment Variables, click Add Another Row.
Enter PATH in Name, and fill Value with directories that contain the system commands.
Click Apply.

To deploy the Control Center Agent to OC4J:
On the breadcrumb, click OC4J:home.
On the OC4J:home screen, click the Applications tab.
Click Deploy to begin deploying Control Center Agent.

On the Deploy: Select Archive screen, under Archive, select Archive is present on local host. Upload the archive to the server where Application Server Control is running.
Click Browse and locate the jrt.ear file in the OWB_HOME/owb/jrt/applications directory.
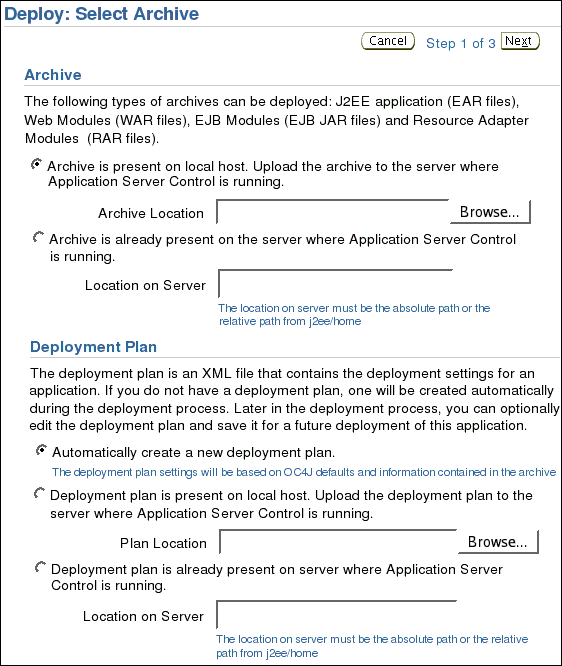
Under Deployment Plan, select Automatically create a new deployment plan.
Click Next.
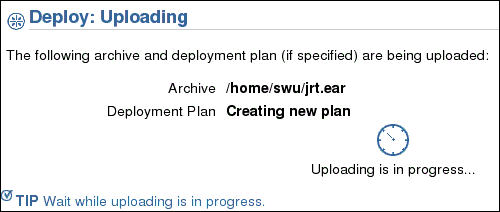
While the upload is in progress, you see the Deploy: Uploading screen.
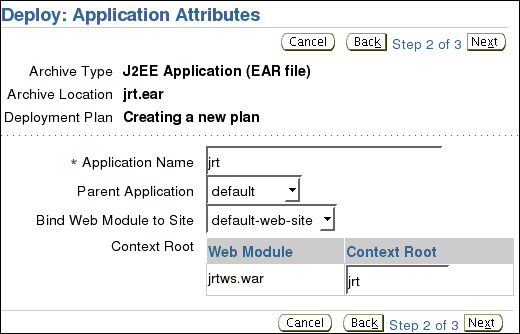
On the Deploy: Application Attributes screen, enter Application Name jrt, and Context Root jrt. Leave the other attributes at their default values.
Click Next.
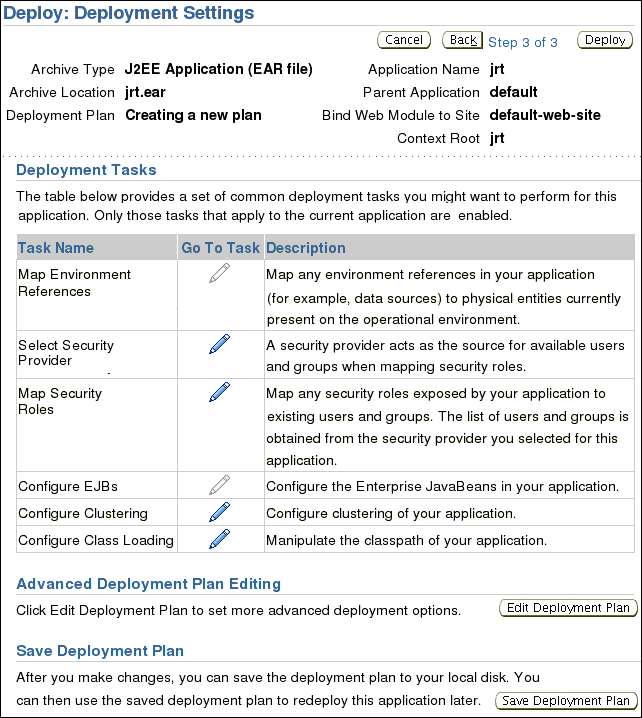
On Deploy: Deployment Settings screen, leave all attributes at their default values, and click Deploy.
After the application is successfully deployed, a confirmation message displays.
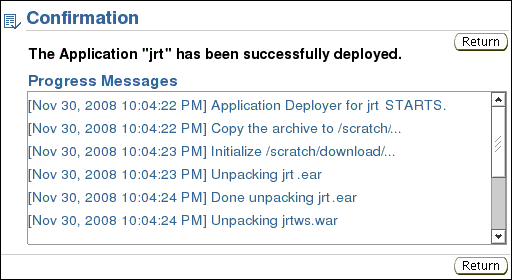
On the Confirmation screen, click Return.
Under the Applications tab, expand All Applications, then expand default.
The new application CCA is up.
The Control Center Agent Web Service is deployed automatically with Control Center Agent. No additional setup is required.
To check that the Web Service is running:
On the breadcrumb, click OC4J:home.
On the OC4J:home screen, click the Web Services tab.
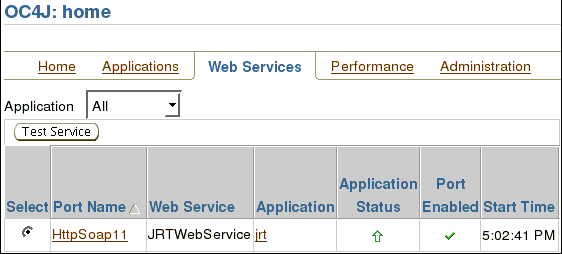
Under the Web Services tab, select JRTWebService and click Test Service.
On the Test Web Service: HttpSoap11 screen, under Discovered Web sites, select the http site and click Test Web Service.
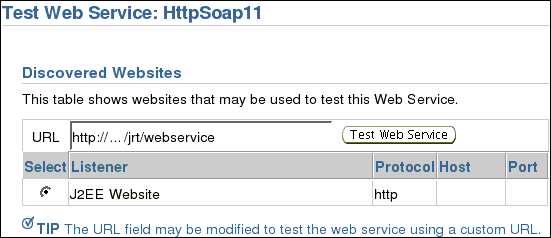
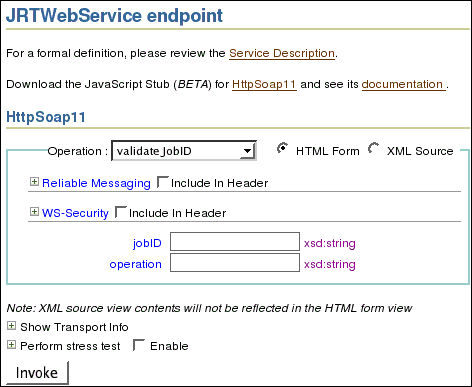
The JRTWebService endpoint screen displays that the Web Service is running.
You can access the operations available from the Operation drop down box, fill in the required parameters, and then click Invoke to execute the operation.
[Optional] Alternatively, go to http://AS_hostname/jrt/webservice.
To use the Web Service with a secure Web site (available only to admin users):
Create or modify the secure-web-site.xml file in the config directory.
A sample secure-web-site.xml file is listed below.
The relevant code is in bold typeface.
Particularly, ensure that protocol is set to https, secure is set to true, and a secure http port is identified. Additionally, you must create a keystore file and add the ssl-config entry (you must use an absolute path for the key store file).
<?xml version="1.0" standalone="yes"?>

<web-site
  xmlns:xsi="http://www.w3.org/2001/XMLSchema-instance"
  xsi:noNamespaceSchemaLocation=
    "http://xmlns.oracle.com/oracleas/schema/web-site-10_0.xsd"
  display-name="OC4J 10g (10.1.3) Secure Web Service"
  schema-major-version="10"
  schema-minor-version="0"
  protocol="https"
  port="4443"
  secure="true"
>
  <ssl-config keystore="directory_path/owb/jrtrun/config/serverkeystore.jks"
    keystore-password="password"/>

  <default_web_app application="default" name="defaultWebApp" />
  <web-app application="system" name="dms0" root="/dmsoc4j" access-log="false"
    load-on-startup="true" />
  <web-app application="system" name="dms0" root="/dms0" access-log="false"
    load-on-startup="true" />
  <web-app application="system" name="JMXSoapAdapter-web"     root="/JMXSoapAdapter" />
  <web-app application="default" name="jmsrouter_web" root="/jmsrouter"
    load-on-startup="true" />
  <web-app application="javasso" name="javasso-web" root="/jsso"
    load-on-startup="false" />
  <web-app application="ascontrol" name="ascontrol" root="/em"
    load-on-startup="true" ohs-routing="false"/>
  <web-app application="jrt" name="jrtws" load-on-startup="true" root="/jrt" />

  <!-- Access Log, where requests are logged to -->
  <access-log path="../log/secure-web-access.log"
             split="day" />

  <!- Uncomment this to use ODL logging capabilities
  <odl-access-log path="../log/secure-web-access" max-file-size="1000"
  max-directory-size="10000" />
  -->

</web-site>
After you create the secure-web-site.xml file, deploy it to jrtws.war, you may access the JRTWebService securely through https://hostname:4443/jrt/webservice.
To enable Audit Table logging, you must set up a connection pool, and then a managed data source before Control Center Agent deployment.
To configure the OWBSYS Audit Connection Pool:
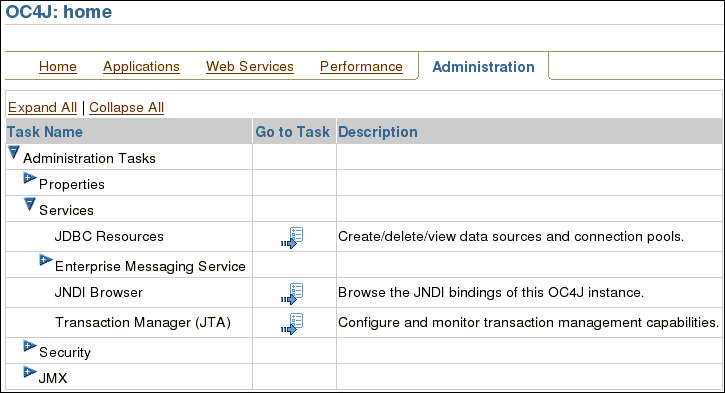
On the breadcrumb, click OC4J:home.
On the OC4J:home screen, click the Administration tab.
Expand Services.
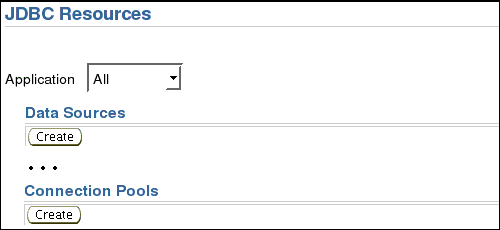
On the JDBC Resources screen, under Connection Pools, click Create.
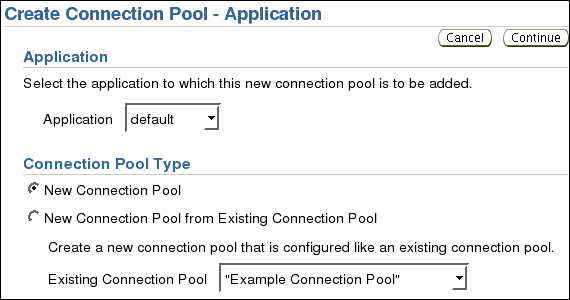
On the Create Connection Pool - Application screen, under Application, select default.
Under Connection Pool Type, select New Connection Pool.
Click Continue.
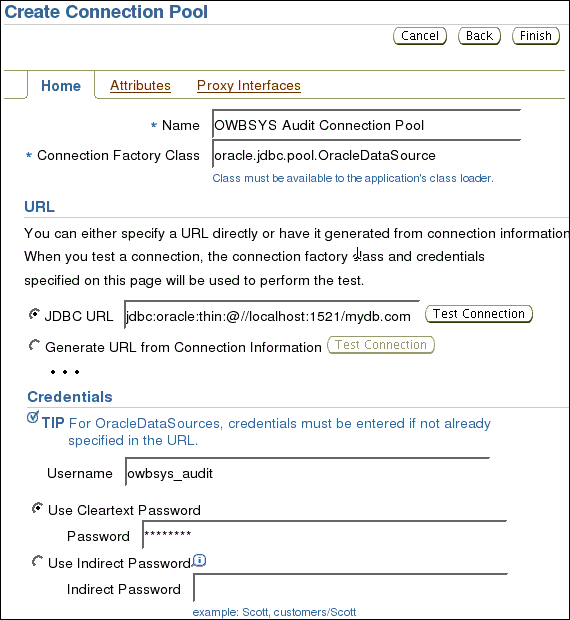
On the Create Connection Pool screen, enter the Name OWBSYS Audit Connection Pool. Under URL, select JDBC URL, and enter the URL (in this example, jdbc:oracle:thin:@localhost:1521:ora111 is used for a local installation).
Under the Credential section, enter the User Name (in this example, owbsys_audit), and enter the Use Cleartext Password.
[Optional] On the Confirmation screen, test the availability of the connection. Click Test Connection.
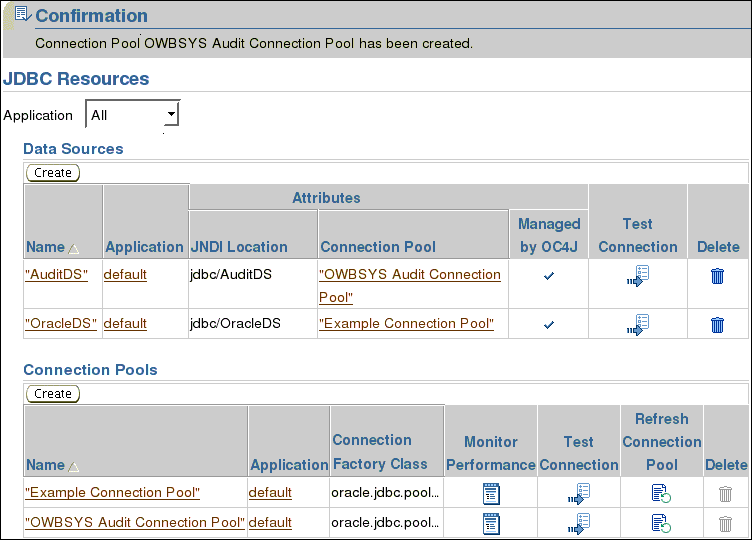
On the Test Connection: "OWBSYS Audit Connection Pool" screen, click Test.

A confirmation screen appears.
Note:
Application Server 10g is not case-sensitive when verifying Oracle Database credentials; it converts all letters to lowercase before attempting to connect to the database. Because Oracle Database Release 11g Release 1 and subsequent releases are case sensitive, create user credentials in lowercase when using for Audit Table logging to prevent theInvalid username/password error message.To deploy Control Center Agent to OC4J, you must also configure the data source for the audit table. This data source is required by Control Center Agent; if not configured, the Control Center Agent deployment fails.
To configure the audit table data source:
On the breadcrumb, click OC4J:home.
On the OC4J:home screen, click the Administration tab.
Expand Services.
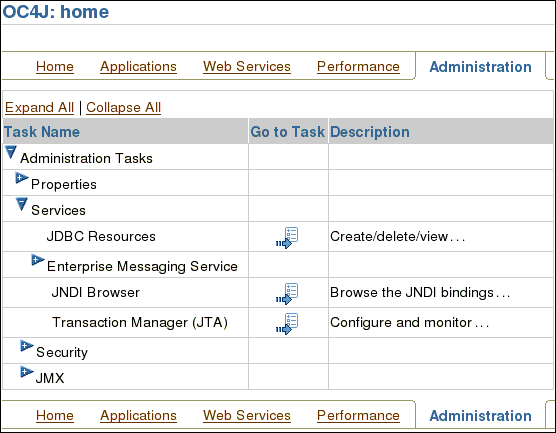
On the JDBC Resources screen, under Data Sources, click Create.

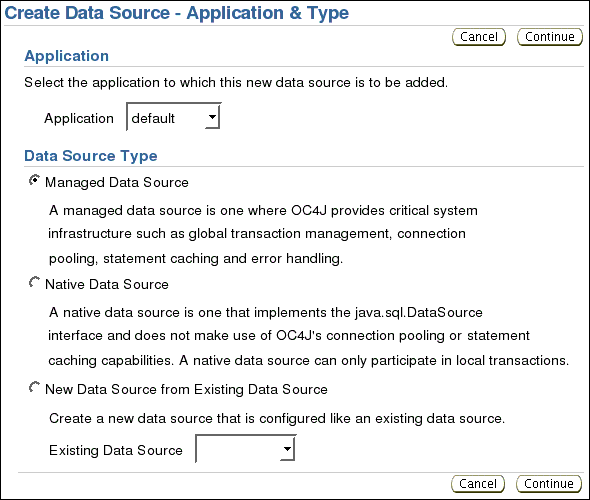
On the Create Data Source - Application & Type screen:
Under Application, select Application default.
Click Continue.
On the Create Data Source - Managed Data Source screen,
If you do not require audit table logging, leave other parameters at their default values.
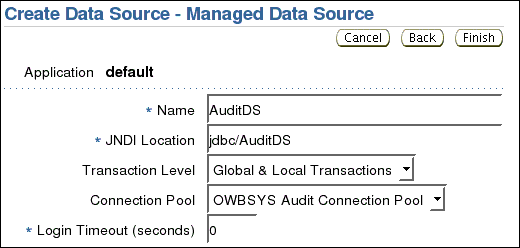
The following instructions demonstrate how to install JDBC drivers for OC4J.
To install the JDBC drivers for OC4J:
Obtain the *.jar file that contains the JDBC driver for your desired platform.
Stop the OC4J service.
Copy the JDBC driver file into the AS_HOME/j2ee/home/applib directory, where AS_HOME is the Application Server home.
Restart the OC4J service.
This section describes the files generated at run time. If you application name is other than jrt, it appears in these directory paths as app_name.
The Control Center Agent files include:
By default, ODL Job log files are located in the AS_HOME/j2ee/home/log/app_name directory.
Each job log resides in its own directory. For example, log file for job 10 is in AS_HOME/j2ee/home/log/app_name/job10/log.xml, and the metadata file for job 10 in AS_HOME/j2ee/home/log/app_name/job10/meta_data.txt.
You may choose to configure Control Center Agent to store the log files in other directories; ensure that Control Center Agent can access these log directories.
The Control Center Agent run-time log file app_name.log employs the ODL log file rotation mechanism. The current run-time log is always app_name.log, while older log files are app_name.log.N, where N is the round of log rotation). By default, this file is:
AS_HOME/j2ee/home/log/app_name.log
Control Center Agent uses a file to keep track of the current job ID in the system; be careful not to remove this file. This file can be in one of two possible locations:
When the Control Center Agent is installed as part of the larger Oracle Warehouse Builder installation, the file is at:
OWB_HOME/owb/jrt/application-deployments/jrt/counter/counter.info
When the Control Center Agent is installed on the Application Server, the file is at:
AS_HOME/j2ee/home/applications/application_name/counter/counter.info
Control Center Agent settings are persisted in the file jrt.xml. You may modify the settings in this file directly, and then restart Control Center Agent. Alternatively, you can modify these settings by changing the attributes of the "JRTAdministratorMBean" in Enterprise Manager. This file is:
AS_HOME/j2ee/home/applications/app_name/config/jrt.xml
The JRTAdministratorMBean enables you to dynamically change Control Center Agent settings without restarting the Control Center Agent.
To change Control Center Agent settings with the JRTAdministratorMBean
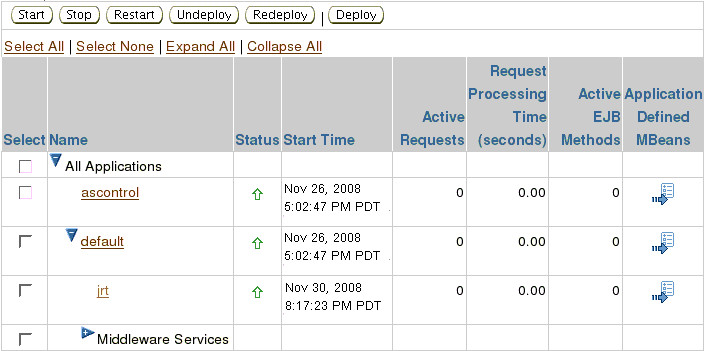
On the breadcrumb, click OC4J:home.
On the OC4J:home screen, click the Applications tab.
Expand All Applications, then expand default.
In the jrt row, click the task icon in column Application Defined MBeans.
On the Application MBeans screen, in the left-hand side navigation menu, select JRTAdministrator.
The right-hand side shows all the Attributes and Operations of JRTAdministrator MBean, under the corresponding tabs.
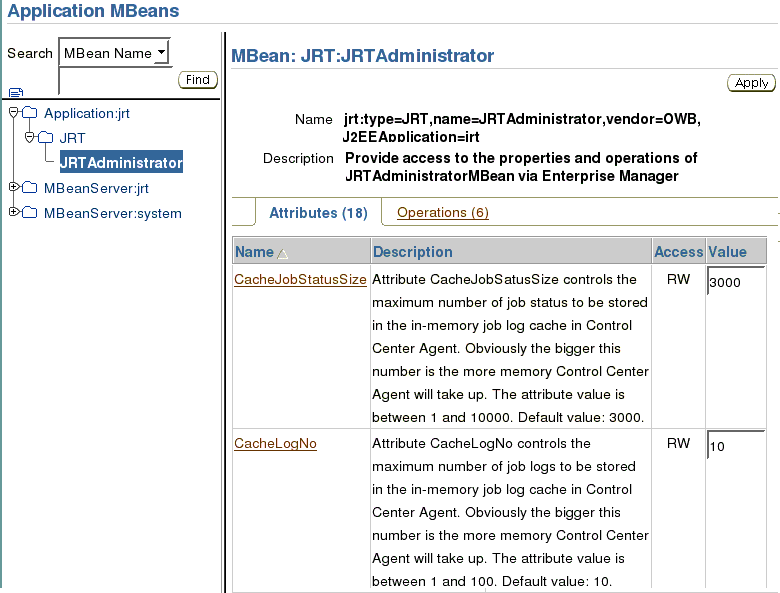
Change the attributes to desired values, then click Apply.
To use a code template, you must install any additional JDBC driver files that it requires to access heterogeneous systems on all the client computers and on the computer that hosts the Control Center Agent.
Load the required JDBC drivers to the OWB_HOME/owb/lib/ext directory.
Import the code templates into any projects that uses them, in the design client.
Import the code template for the project. After it is imported, all users working on the project can use the code template.
When integrating with Oracle E-Business Suite (EBS), you must first import its metadata, and then design mappings for moving and transforming data. Specifically:
During the design phase, Oracle Warehouse Builder users must have access to metadata in the APPS schema.
During the execution phase, Oracle Warehouse Builder users must access the data in the APPS schema.
Because direct access to the APPS production schema may be limited and restricted, you may define a user on the EBS database for Oracle Warehouse Builder users to access only the relevant metadata and data.
To enable access to EBS data and metadata:
Create a user on the database that hosts the EBS. This user needs, at minimum, CONNECT and RESOURCE privileges.
Grant access to the relevant metadata by running the OWB_HOME\owb\cmi\ebs\owbebs.sql script.
This script grants access to the following tables in the APPS schema, which contain metadata for EBS tables, views, sequences, and keys:
The script also creates a synonym in the user schema for each of the preceding objects.
Enable a user to extract data from the EBS database.
You can create a new user, or grant the appropriate privileges to the same user you created earlier. For each object from which you want to enable data extraction, grant this user at least SELECT access.
Oracle Warehouse Builder users can now import the E-Business Suite metadata as described in the importing section of Oracle Warehouse Builder Data Modeling, ETL, and Data Quality Guide.
Oracle Warehouse Builder gives you the option to perform name and address cleansing on your data with the Name and Address operator. The Name and Address operator identifies and corrects errors and inconsistencies in name and address source data. The operator identifies inconsistencies by comparing input data to data libraries supplied by the third-party name and address cleansing software vendors. Purchase the data libraries directly from these vendors.
To install data libraries, refer to the installation instructions of the name and address cleansing software vendor of your choice. For the list of certified name and address cleansing software providers, refer to Oracle Technology Network at http://www.oracle.com/technetwork/developer-tools/warehouse/overview/index.html.
To integrate with third-party name and address data libraries:
Install Oracle Warehouse Builder as instructed in this guide.
Purchase data libraries from certified vendors listed on My Oracle Support at https://support.oracle.com.
Install and access the certified vendor's data libraries and Name and Address adapter following the vendor's instructions.
If you are installing in an Oracle Real Application Cluster environment, then you may be able to install the name and address adapter on many nodes to benefit from the parallelism and failover enabled by Oracle RAC architecture. Check with your vendor to see if your purchase license allows a multiple-node installation.
You are not required to install the data libraries on multiple nodes. However, if you install all data libraries on one node, then performance may suffer due to file access time latency. Follow the recommendations of your name and address cleansing software vendor.
Design a mapping using the Name and Address operator to cleanse name or address data. Refer to Oracle Warehouse Builder Data Modeling, ETL, and Data Quality Guide for information on designing mappings using the Name and Address operator.
If you plan to use Oracle Warehouse Builder process flows, then use Oracle Workflow to enable deployment as described in this section.
See Also:
Oracle Warehouse Builder Data Modeling, ETL, and Data Quality Guide for more information about schedules.To enable integration with Oracle Workflow:
Stop all running OC4J instances.
Locate Oracle Workflow installation program, at OWB_HOME\owb\wf\install\wfinstall.*.
If you installed Oracle Warehouse Builder 11g on Oracle Database 10g Release 2, separately download the software for Oracle Workflow 2.6.4.
Start Oracle Workflow installation program.
On Windows, enter the following at the command prompt:
C:\>  cd OWB112\owb\wf\install
C:\OWB112\owb\wf\install> wfinstall.bat
On Linux, enter the following in the shell:
% cd OWB112/owb/wf/install
% wfinstall.csh
If you use multiple Oracle databases, you must unset the environment variables related to Oracle, such as ORACLE_HOME, ORACLE_SID, ORACLE_PORT, and LD_LIBRARY_PATH.
Complete the Workflow Configuration Assistant using following values:
SYS Password: sys_password; use the SYS password for the database where installing Oracle Workflow.
TNS Connect Descriptor: hostname:port:service_name, where the values correspond to your database.
Because the assistant does not reference the tnsnames.ora file, do not use a net service name.
LDAP Parameters: this is optional; see Oracle Workflow documentation for details.
Mailer Parameters: this is optional; see Oracle Workflow documentation for details.
Tablespace: this is optional; you may change the tablespace.
Click Submit to start the Workflow configuration process.
The configuration process can take several minutes. Check OWB112/owb/wf/install/wf.log for messages to follow the progress of the configuration process.
When the process is complete, the Workflow Configuration Assistant displays a message of completion.
Install the Workflow Client [Optional].
The installation of Oracle Workflow client is optional because the Process Flow Editor in Oracle Warehouse Builder replaces its functionality. You may want to install Oracle Workflow client to view the deployed Oracle Warehouse Builder processes in Oracle Workflow.
On the computer that hosts Oracle Warehouse Builder client, install Oracle Workflow client from Oracle Workflow client CD.
When the Workflow instance is not on the same computer that hosts Oracle Warehouse Builder repository, you must create a proxy user.
Within the database hosting the repository, use SQL Plus to create a user and grant it the OWB_USER role as a default. It enables the remote Oracle Workflow instance to connect to the services provided by the Control Center.
Considerations for the OWB_USER Role
If you encounter a problem when trying to grant the OWB_USER role, then possibly OWB_USER exists in an earlier Oracle Warehouse Builder implementation. In this case, you must first rename the existing OWB_USER to something else before you can grant a user the OWB_USER role in the current release. In order to retain the properties for the renamed role, you must register it in the new installation of Release 11.2.